Honda HR-V: Adjusting the Mirrors
Interior Rearview Mirror
Adjust the angle of the rearview mirror when you are sitting in the correct driving position.
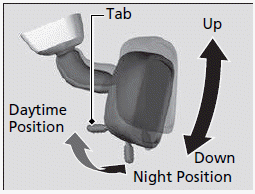
■Rearview Mirror with Day and Night Positions
Flip the tab to switch the position.
The night position will help to reduce the glare from headlights behind you when driving after dark.
Keep the inside and outside mirrors clean and adjusted for best visibility.
Adjust the mirrors before you start driving.
■Automatic Dimming Rearview Mirror
When driving after dark, the automatic dimming rearview mirror reduces the glare from headlights behind you. Press the auto button to turn this function on and off. When activated, the auto indicator comes on.
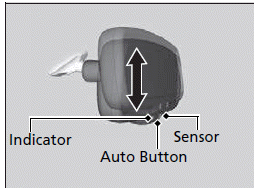
The auto dimming function cancels when the shift lever is in (R).
Power Door Mirrors
You can adjust the door mirrors when the ignition switch is in ON (II)*1.
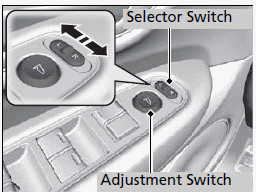
■ Mirror position adjustment
L/R selector switch: Select the left or right mirror. After adjusting the mirror, return the switch to the center position.
Mirror position adjustment switch: Press the switch left, right, up, or down to move the mirror.
■Expanded View Driver's Mirror
The driver side door mirror has outer and inner segments.
The outer segment is slightly curved to provide a wider angle view than a standard flat mirror.
This wider view may help you check areas that are not visible using a standard door mirror.
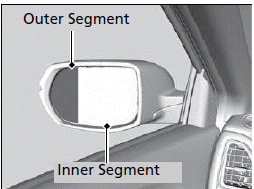
Objects visible in the outer segment of the driver side door mirror appear smaller than objects in the rest of the mirror. But in fact, they are closer than they appear.
Do not rely on your mirrors. Always look to the side and behind your vehicle before changing lanes.
*1: Models with the smart entry system have an ENGINE START/STOP button instead of an ignition switch.
READ NEXT:
 Adjusting the Seat Positions
Adjust the driver's seat as far back as possible
while allowing you to maintain full control of
the vehicle. You should be able to sit upright,
well back in the seat and be able to
adequately press th
Rear Seats
■Adjusting the Rear Seat-Backs
Pull the lever on the right to change the angle
of the right half of the seat-back, and left for
the left half.
■Folding Down the Rear Seats
The rear seats can be f
SEE MORE:
VSA & TPMS Control Unit - Diagnostics
DTC TROUBLESHOOTING
DTC TROUBLESHOOTING C0077-78: LOW TIRE AIR PRESSURE
NOTE:
Before troubleshooting, check the outside air temperature sensor. If
outside air temperature sensor is
failed, the VSA modulator-control unit may set this code.
Make sure to avoid lopsided loading on one side (left o
Radiator and A/C Condenser Fan, Motor, and Shroud Removal and
Installation
Removal and Installation
1. 12 Volt Battery - Remove
2. Front Grille Cover - Remove
3. Air Intake Duct - Remove
4. Front Grille Center Stay - Remove
5. Hood Latch - Remove
NOTE:
Do not disconnect the hood opener cable.
Disconnect the connector at the same time.
6. Engine Undercover - Remove (Wit
