Honda HR-V: Climate Control System
Using Automatic Climate Control
The automatic climate control system maintains the interior temperature you select.
The system also selects the proper mix of heated or cooled air that raises or lowers the interior temperature to your preference as quickly as possible.
Models without SYNC icon
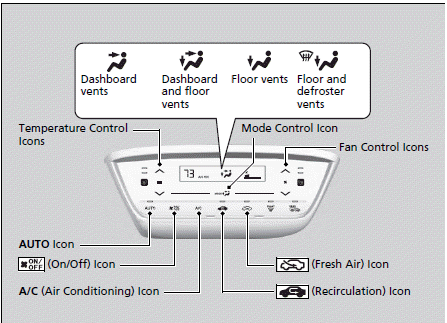
Use the system when the engine is running.
1. Select the AUTO icon.
2. Adjust the interior temperature using the temperature control icons.
3. Select the .png) icon to cancel.
icon to cancel.
If any icons are selected while using the climate control system in auto, the function of the icon that was selected will take priority.
The AUTO indicator will go off, but functions unrelated to the icon that was selected will be controlled automatically.
To prevent cold air from blowing in from outside, the fan may not start immediately when the AUTO icon is selected.
If the interior is very warm, you can cool it down more rapidly by partially opening the windows, turning the system on auto, and setting the temperature to low. Change the fresh air mode to recirculation mode until the temperature cools down.
When you set the temperature to the lower or upper limit, Lo or Hi is displayed.
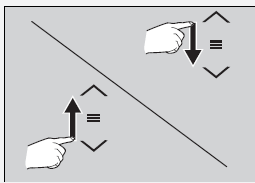
You can raise or lower the temperature or fan speed setting flicking either control icon.
Models with SYNC icon
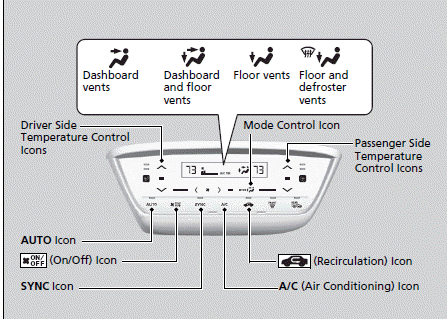
Use the system when the engine is running.
1. Select the AUTO icon.
2. Adjust the interior temperature using the driver side temperature control icons.
3. Select the .png) icon to cancel.
icon to cancel.
Selecting the .png) icon
icon
switches the climate control
system between on and off. When turned on, the
system returns to your last selection.
The climate control system is voice operable. See the navigation system manual.
Models with ECON button
While in ECON mode, the system has greater temperature fluctuations.
■ Switching between the recirculation and fresh air modes
Models without SYNC icon
Select the .png) (recirculation) or
(recirculation) or
.png) (fresh air) icon to switch the mode
(fresh air) icon to switch the mode
depending on environmental conditions.
.png) Recirculation mode (indicator on):
Recirculation mode (indicator on):
Recirculates air from the vehicle's interior
through the system.
.png) Fresh air mode (indicator on):
Fresh air mode (indicator on):
Maintains outside ventilation. Keep the system
in fresh air mode in normal situations.
Models with SYNC icon
Select the .png) (recirculation) icon
(recirculation) icon
to switch the mode depending on
environmental conditions.
Recirculation mode (indicator on): Recirculates air from the vehicle's interior through the system.
Fresh air mode (indicator off): Maintains outside ventilation. Keep the system in fresh air mode in normal situations.
■Defrosting the Windshield and Windows
Select the .png) icon to turn the air
icon to turn the air
conditioning
system on and automatically switch the
system to fresh air mode.
Select the .png) icon again to turn off,
icon again to turn off,
the
system returns to the previous settings.
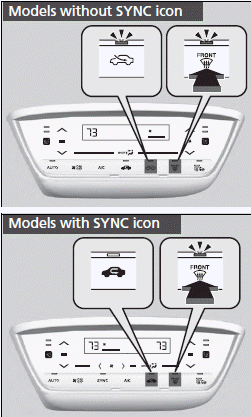
For your safety, make sure you have a clear view through all the windows before driving.
Do not set the temperature near the upper or lower limit.
When cold air hits the windshield, the outside of the windshield may fog up.
If the side windows fog up, adjust the vents so that the air hits the side windows.
■ To rapidly defrost the windows
1. Select the .png) icon.
icon.
2. Select the .png) icon.
icon.
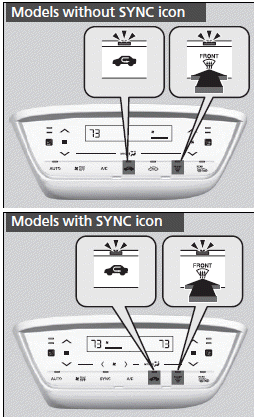
After defrosting the windows, switch over to fresh air mode. If you keep the system in recirculation mode, the windows may fog up from humidity. This impedes visibility.
■Turning On and Off the Touch Screen Beep
You hear the beep when operating the climate control system on the touch screen.
This can be turned on and off.
To turn off the beep:
1. Turn the ignition switch to ON (II)*1.
2. Touch the .png) of the temperature
of the temperature
control
icon five times while pressing and holding
the .png) .
.
3. Release the .png) , after -- blinks
, after -- blinks
five times
and OF is displayed.
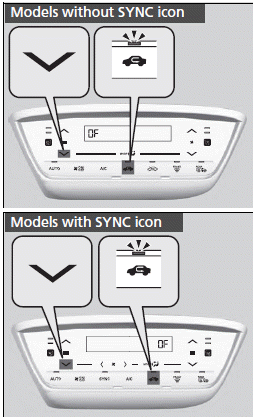
If you touch any other icons during this procedure, the setting may fail. In this case, once you turn the ignition switch to OFF (0)*1, then follow this Models without SYNC icon procedure again.
*1: Models with the smart entry system have an ENGINE START/STOP button instead of an ignition switch.
To turn on the beep:
1. Turn the ignition switch to ON (II)*1.
2. Touch the .png) of the temperature
of the temperature
control
icon five times while pressing and holding
the .png) .
.
3. Release the .png) , after OF blinks
, after OF blinks
five times
and -- is displayed.
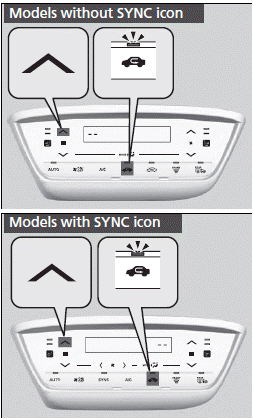
*1: Models with the smart entry system have an ENGINE START/STOP button instead of an ignition switch.
Synchronized Mode
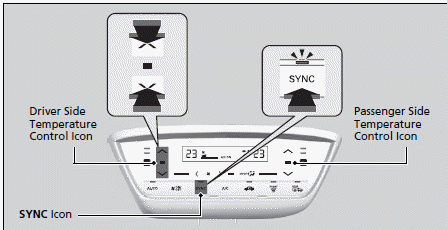
You can set the temperature synchronously for the driver side and the passenger side in synchronized mode.
1. Select the SYNC icon.
- The system switches to synchronized mode.
2. Adjust the temperature using the driver's side temperature control icon.
Select the SYNC icon to return to dual mode.
When the system is in dual mode, the driver side temperature and the passenger side temperature can be set separately.
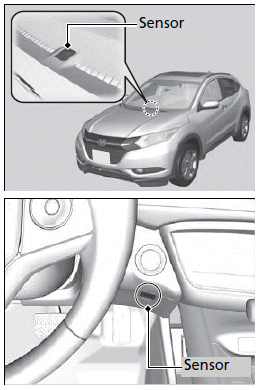
Automatic Climate Control Sensors
The automatic climate control system is equipped with sensors. Do not cover or spill any liquid on them.
