Honda HR-V: Brightness Control
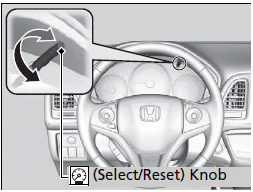
When the ignition switch is in ON (II)*1, you
can use the .png) (select/reset) knob to
(select/reset) knob to
adjust
instrument panel brightness.
Brighten: Turn the knob to the right.
Dim: Turn the knob to the left.
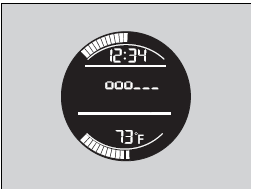
You will hear a beep when the brightness reaches minimum or maximum. The information display will return to its original state several seconds after you adjust the brightness.
■ Brightness level indicator
The brightness level is shown on the information display while you are adjusting it.
Instrument panel brightness varies, depending on whether the exterior lights are on or off. The instrument panel dims to reduce glare when they are on.
Pressing the knob switches
the display between
the brightness level and other available information.
If you turn the knob to the right until the brightness display is up to max, the beeper sounds. This cancels the reduced instrument panel brightness when the parking lights are on.
The brightness can be set differently for when the exterior lights are on, and when they are off.
*1: Models with the smart entry system have an ENGINE START/STOP button instead of an ignition switch.
Defogger/Heated Door Mirror*/Heater Windshield
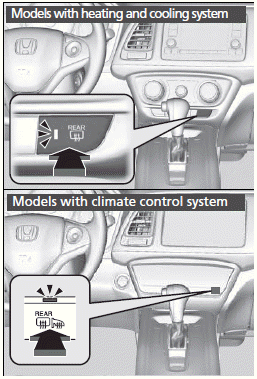
■Rear Defogger/Heated Door Mirror* Button
Press the rear defogger button or touch the icon to defog the rear window and mirrors when the ignition switch is in ON (II)*1.
Models with climate control system
The rear defogger and heated door mirrors automatically switch off after 10-30 minutes depending on the outside temperature.
However, if the outside temperature is 32ºF (0ºC) or below, they do not automatically switch off.
NOTICE
When cleaning the inside of the rear window, be careful not to damage the heating wires.
It is critical to wipe the window from side to side along the defogger heating wires.
This system consumes a lot of power, so turn it off when the window has been defogged.
Also, do not use the system for a long period when the engine is idling. This may weaken the battery, making it difficult to start the engine.
*1: Models with the smart entry system have an ENGINE START/STOP button instead of an ignition switch.
Canadian models
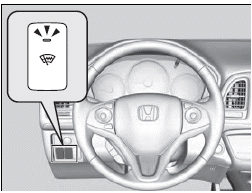
■Heated Windshield Button
Press the heated windshield button to deice the windshield when the ignition switch is turned to ON (II)*1.
The heated windshield automatically switch off after 15 minutes.
This system consumes a lot of power, so turn it off when the window has been defogged or deiced.
*1: Models with the smart entry system have an ENGINE START/STOP button instead of an ignition switch.
Adjusting the Steering Wheel
The steering wheel height and distance from your body can be adjusted so that you can comfortably grip the steering wheel in an appropriate driving posture.
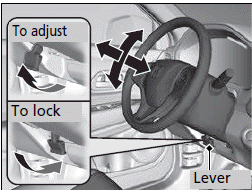
1. Pull the steering wheel adjustment lever up.
- The steering wheel adjustment lever is under the steering column.
2. Move the steering wheel up or down, and in or out.
- Make sure you can see the instrument panel gauges and indicators.
3. Push the steering wheel adjustment lever down to lock the steering wheel in position.
- After adjusting the position, make sure you have securely locked the steering wheel in place by trying to move it up, down, in, and out.
WARNING
Adjusting the steering wheel position while driving may cause you to lose control of the vehicle and be seriously injured in a crash.
Adjust the steering wheel only when the vehicle is stopped.
Make any steering wheel adjustments before you start driving.
READ NEXT:
 Adjusting the Mirrors
Interior Rearview Mirror
Adjust the angle of the rearview mirror when you are sitting in the correct
driving
position.
■Rearview Mirror with Day and Night Positions
Flip the tab to switch the posit
Adjusting the Seat Positions
Adjust the driver's seat as far back as possible
while allowing you to maintain full control of
the vehicle. You should be able to sit upright,
well back in the seat and be able to
adequately press th
SEE MORE:
Component Replacement/Inspection After Deployment
SRS COMPONENT REPLACEMENT/INSPECTION AFTER DEPLOYMENT (KA/KC)
Inspection
1. Component Replacement/Inspection After Deployment - Inspect
NOTE:
Do not repair damaged SRS wiring. Replace the affected wiring harness (es).
Before doing any SRS repairs, check for DTCs with the HDS, for the less
obvio
Coolant Replacement
Replacement
1. Radiator Cap - Remove
Wait until the engine is cool, then carefully remove the radiator cap.
2. Engine Undercover - Remove (With Engine Undercover)
3. Engine Coolant - Drain
Loosen the drain plug (A), and drain the coolant
After the coolant has drained, tighten the radiator dra
