Honda HR-V: Gauges and Displays
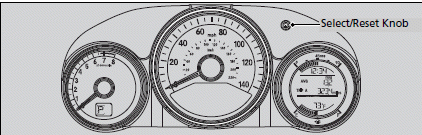
Gauges
Gauges include the speedometer, tachometer and related indicators. They are displayed when the ignition switch is in ON (II)*1.
■Speedometer
Displays your driving speed in mph and km/h.
■Tachometer
Shows the number of engine revolutions per minute.
*1: Models with the smart entry system have an ENGINE START/STOP button instead of an ignition switch.
Information Display
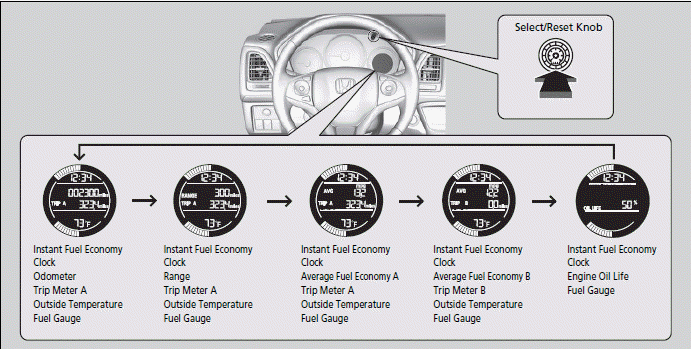
The information display shows the fuel gauge, odometer, trip meter, engine oil life and maintenance service item codes, and other gauges.
■Switching the Display
Press the .png) (select/reset) knob to
(select/reset) knob to
change the display.
Models with display audio system
Some of the items on the information display also appear on the audio/information screen. They also change along with the information display changes while the fuel consumption is shown.
■Instant Fuel Economy
Shows the instant fuel economy as a bar graph in mpg (U.S.) or l/100 km (Canada).
■Odometer
Shows the total number of miles (U.S.) or kilometers (Canada) that your vehicle has accumulated.
■Trip Meter
Shows the total number of miles (U.S.) or kilometers (Canada) driven since the last reset. TRIP A and B can be used to measure two separate trips.
■ Resetting a trip meter
To reset a trip meter, display it, then press and hold the
.png) knob. The trip meter is
knob. The trip meter is
reset to 0.0.
Switch between trip meter A and trip meter B by
pressing the knob.
■Range
Shows the estimated distance you can travel on the remaining fuel. This distance is estimated from the fuel economy of your previous trips.
■Average Fuel Economy
Shows the estimated average fuel economy of each trip meter in mpg (U.S.) or l/100 km (Canada). The display is updated at set intervals. When a trip meter is reset, the average fuel economy is also reset.
■Outside Temperature
Shows the outside temperature in Fahrenheit (U.S.) or Celsius (Canada).
■ Adjusting the outside temperature indicator
Adjust the temperature reading up to +- 5ºF or +- 3ºC if the temperature reading seems incorrect.
1. Turn the ignition switch to ON II*1.
2. Press and hold the
(Select/Reset) knob for 10 seconds or more while the
outside temperature is shown on the information display.
- The information display goes into temperature adjustment mode. The display starts showing from -5ºF to +5ºF (U.S.) or -3ºC to +3ºC (Canada).
3. Release the knob when
the right adjustment amount is shown.
- The adjustment is complete.
The temperature sensor is in the front bumper.
Road heat and exhaust from another vehicle can affect the temperature reading when your vehicle speed is less than 19 mph (30 km/h).
It may take several minutes for the display to be updated after the temperature reading has stabilized.
When the engine oil life is shown on the information display, you cannot adjust the outside temperature.
Push the knob to select the other
display.
*1: Models with the smart entry system have an ENGINE START/STOP button instead of an ignition switch.
■Engine Oil Life and Maintenance Items
Shows the remaining oil life and Maintenance MinderTM.
■Fuel Gauge
Displays the amount of fuel left in the fuel tank.
NOTICE
You should refuel when the reading approaches
.png) .
.
Running out of fuel can cause the engine to misfire, damaging the catalytic converter.
The actual amount of remaining fuel may differ from the fuel gauge reading.
■Changing Ring Color
The center ring illumination can be changed to a color of your choice. With the ignition switch in the ACCESSORY (I) or LOCK (0)*1 position and with the meter ring illuminated, press the select/reset knob. Each time the knob is pressed, the colors change in the following order:
White .png) Blue
Blue
.png) Purple
Purple
.png) Pink
Pink
.png) Red
Red
.png) Amber
Amber
.png) Yellow
Yellow
*1: Models with the smart entry system have an ENGINE START/STOP button instead of an ignition switch.
READ NEXT:
 Clock
Clock
Adjusting the Clock
Models without navigation system
You can adjust the time in the clock display with the ignition switch is in
ON (II)*1.
■Adjusting the Time
■ Display audio system
1. Select th
SEE MORE:
DTC B12C6 Electric Steering Lock Switch C/D Monitor Circuit Failure
DTC (Power Control Unit)
NOTE: If you are troubleshooting multiple DTCs, be sure to follow the
instructions in B-CAN System
Diagnosis Test Mode A - Refer to: Body Electrical Troubleshooting - B-CAN System
Diagnosis Test Mode
A - Initial Communication and DTC Checks.
1. Problem verification:
&nb
A/C Refrigerant Recovery/Evacuation/Charging
*Available through the Honda Tool and Equipment Program; call 888-424-6857
Special Tools Required
Compact
Electronic
Vacuum Gauge
Robinair
ROB14777,
commercially
available
R134a A/C
Automatic
Recovery,
Recycle,
Recharge
Machine
ROB48920T,
commercially
available
*Available through the Honda Tool an
