Honda HR-V: ATEQ TPMS Reset Procedure
ATEQ TPMS RESET PROCEDURE
WITH INFORMATION DISPLAY
NOTE:
- TPMS cannot be calibrated if a compact spare tire is installed.
- The calibration process requires approximately 30 minutes of cumulative driving at speeds between 30 to 60 mph (48-97 km/h).
- During this period, if the ignition is turned on and the vehicle is not moved within 45 seconds, you may notice the low tire pressure indicator comes on briefly. This is normal and indicates that the calibration process is not yet complete.
1. Set the tire pressure of all wheels to specified pressure.
2. Press and hold the TPMS Reset button (located at lower dash, left of steering wheel) until the TPMS Indicator Light blinks twice, indicating the calibration process has begun. See Fig. 1.
3. The calibration process finishes automatically while driving.
NOTE: If the TPMS Indicator Light does not blink, confirm conditions in the Note above, then press and hold the TPMS Reset button again.
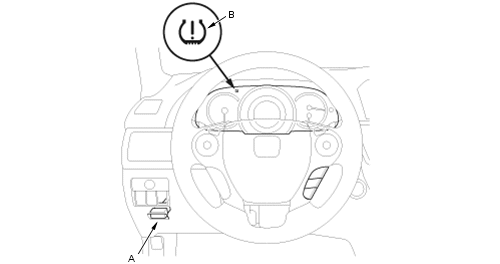
Fig. 1: Identifying TPMS Reset Button & TPMS Indicator Light
WITH MULTI-INFORMATION DISPLAY (MID)
1. Set the tire pressure of all wheels to specified pressure.
2. Turn ignition ON.
NOTE: Vehicle must be stopped with the transmission in neutral (M/T), or P
3. Press and hold the INFORMATION button (A) to enter the VEHICLE SETTINGS mode. See Fig. 2.
4. Press the SEL/RESET button (B) until TPMS CALIBRATION appears on the display.
5. Press the SEL/RESET button. The display switches to the customization setup screen, where you can select CANCEL or CALIBRATE.
6. Press the UP/DOWN button and select CALIBRATE, then press the SEL/RESET button.
When calibration successfully begins, "Calibration Started" gets displayed on Multi-information display (C).
NOTE: If calibration does not begin successfully, and "Calibration Failed to Start" gets displayed on Multi-Information Display, ensure steps 1 and 2 were correctly followed and repeat steps 3 and 4.
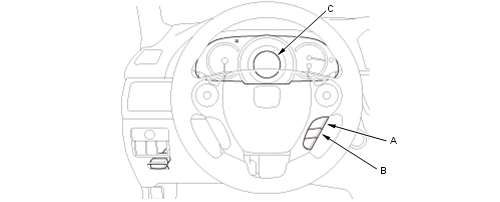
Fig. 2: Identifying Multi-Information Display & Controls
READ NEXT:
 BARTEC TPMS Reset Procedure
Models With Information Display
1. Inflate tires to correct pressure.
2. Apply parking brake.
3. Turn Ignition ON.
4. Press and hold the TPMS button. The MIL will flash.
5. Release parking brake.
Clutch Trouble Shooting
* PLEASE READ THIS FIRST *
NOTE: This is GENERAL information. This article is not intended to be
specific to any
unique situation or individual vehicle configuration. For model-specific
information s
Drive Axle Noise Diagnosis
* PLEASE READ THIS FIRST *
NOTE: This is GENERAL information. This article is not intended to be
specific to any
unique situation or individual vehicle configuration. For model-specific
information s
SEE MORE:
General Information
AUDIO SYSTEM ERROR CODES
The audio system can display a few error codes when some problems are
detected with the audio disc player and the audio disc. This is not a complete
list of audio error codes. Refer
to symptom troubleshooting.
CD Error Codes
*: Display audio type (7-inch screen)
USB Erro
Maintenance Service Reminder
NOTE: To determine the appropriate reset procedure, refer to MAINTENANCE
SERVICE
REMINDER RESET INDEX.
MAINTENANCE REQUIRED REMINDER LIGHT RESET INDEX
MAINTENANCE SERVICE REMINDER RESET - PROCEDURE 1
1. At each 7500 mile service interval, the MAINTENANCE REQUIRED light will
change from Green to
Y
