Honda HR-V: Maintenance Minder General Information (KA/KC Models)
Maintenance Minder
The Maintenance Minder is an important feature of the information display. Based on engine and transmission operating conditions, and accumulated engine revolutions, the HR-V's onboard computer (PCM) calculates the remaining engine oil and the transmission fluid life. The system also displays the remaining engine oil life along with the code(s) for other scheduled maintenance items needing service.
Meter:
MAINTENANCE MINDER GENERAL INFORMATION (KA/KC MODELS)
Maintenance Minder
The Maintenance Minder is an important feature of the information display. Based on engine and transmission operating conditions, and accumulated engine revolutions, the HR-V's onboard computer (PCM) calculates the remaining engine oil and the transmission fluid life. The system also displays the remaining engine oil life along with the code(s) for other scheduled maintenance items needing service.
Meter:
Service Information
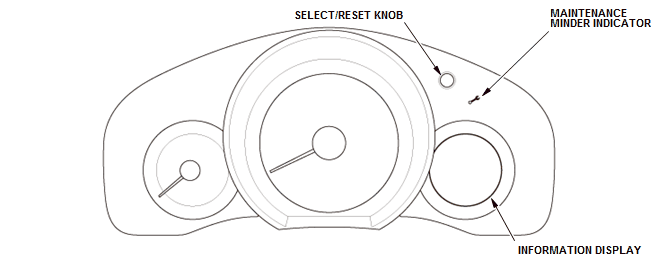
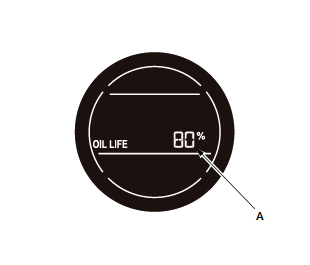
1. The remaining engine oil life (A) is shown as a percentage on the information display. To see the current engine oil life, turn the vehicle to the ON mode, then push and release the Select/Reset knob repeatedly until the engine oil life appears on the information display.
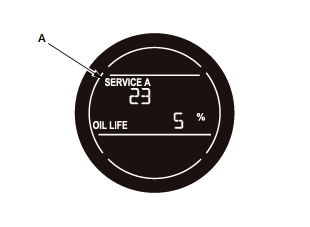
2. When the ignition switch is ON (II), or the vehicle in the ON mode, and the remaining engine oil life is 15 % to 6 %, the remaining engine oil life (A) and other scheduled maintenance item(s) needing service are displayed. The maintenance minder indicator (B) also comes on when the engine oil life is 15 % or less. To cancel the display and the indicator, press the Select/Reset knob.
- Complete list of maintenance main items (C) - Refer to: Maintenance Sub Items (KA/KC models), or Maintenance Main Items (KA/KC models).
- Complete list of maintenance sub items (D) - Refer to: Maintenance Sub Items (KA/KC models), or Maintenance Main Items (KA/KC models).
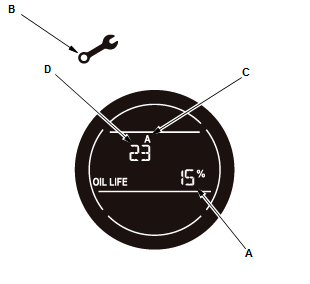
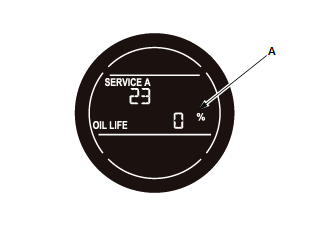
3. When the vehicle in the ON mode, and the remaining engine oil life is 5 % to 1 %, the message "SERVICE" (A) is displayed along with engine oil life and the same maintenance item code(s).
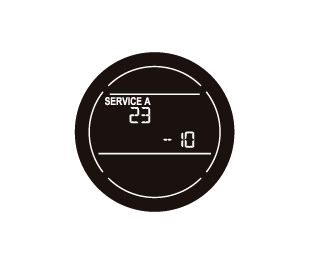
4. When the vehicle in the ON mode, and the remaining engine oil life is 0 %, the engine oil life indicator (A) blinks. Pressing the Select/Reset knob cancels the display, but the Maintenance Minder indicator stays on.
5. If the indicated maintenance is not done, the engine oil life indicator shows a negative distance traveled, for example "-10" on the display. If the negative distance traveled is between 0 and -9, the indicator is displayed for only a few seconds when the vehicle in the ON mode. The negative distance traveled remains displayed after the vehicle is driven more than 10 miles (for USA models) or 10 km (for Canada models) after 0 % oil life is reached, and the display cannot be canceled. This means the indicated maintenance item(s) should have been done more than 10 miles (or 10 km) ago.
Resetting the Maintenance Minder
NOTE:
- The vehicle must be stopped to reset the Maintenance Minder.
- If a required service is done and the Maintenance Minder is not reset, or if the Maintenance Minder is reset without doing the service, the system will not show the proper maintenance timing. This can lead to serious mechanical problems because there will be no accurate record of when the required maintenance is needed.
- The engine oil life and maintenance item(s) can be independently reset with the HDS.
Information Display Select/Reset Knob Method
1. Turn the vehicle to the ON mode.
2. Push the Select/Reset knob repeatedly until the engine oil life indicator is displayed.
3. Press and hold the Select/Reset knob for about 10 seconds. The engine oil life indicator and the maintenance item code(s) will blink.NOTE : If you are resetting the Maintenance Minder when the engine oil life is more than 15 %, make sure any maintenance item(s) requiring service are done before resetting the display.
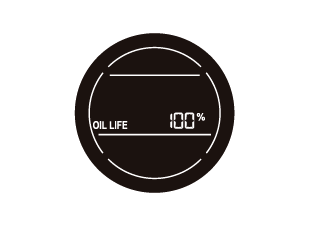
4. Press and hold the Select/Reset knob for another 5 seconds or more. The maintenance item code(s) will disappear, and the engine oil life display returns to "100 %."
Resetting Individual Maintenance Items
1. Connect the Honda Diagnostic System (HDS) to the data link connector (DLC) - Refer to: How to Troubleshoot the Fuel and Emissions Systems, or How to Troubleshoot the CVT System (CVT).
2. Turn the vehicle to the ON mode.
3. Make sure the HDS communicates with the vehicle and the powertrain control module (PCM). If it doesn't communicate, troubleshoot the DLC circuit.
4. Select GAUGES in the BODY ELECTRICAL with the HDS.
5. Select ADJUSTMENT in the GAUGES with the HDS.
6. Select MAINTENANCE INFORMATION in the ADJUSTMENT with the HDS.
7. Select MAINTENANCE MINDER in the MAINTENANCE INFORMATION with the HDS.
8. Select the individual maintenance item you wish to reset with the HDS.
READ NEXT:
 Safety Messages
Your safety, and the safety of others, is very important. To help you make
informed decisions, we have provided safety messages, and other safety
information throughout this manual. Of
course, it is
Service Specifications
SPECIFICATION TABLE
STANDARDS AND SERVICE LIMITS
Engine Electrical
Compression
Cylinder Head
Engine Block
Engine Lubrication
Cooling System
Fuel and Emissions
Clutch
Manual Transmission and
Torque Specifications
TORQUE SPECIFICATIONS (KA/KC MODELS)
NOTE:
Refer to the appropriate portion of the manual for the precautions and
complete procedures.
Refer to the appropriate portion of the manual for the bolts
SEE MORE:
Rear Window Defogger System Description - Control/Function
The Timer Function (Without Climate Control)
The rear window defogger provides the timer control function that is
controlled by the HVAC control unit. The
timer control is operated by turning the vehicle to the ON mode, then turn on
the rear window defogger switch.
The timer operating time varies
DTC Troubleshooting 121-11, 122-11, 123-11, 124-11: VSA Solenoid
Valve Malfunction
NOTE: Before you troubleshoot, review the general troubleshooting
information.
1. Problem verification:
Turn the vehicle to the ON mode.
Clear the DTC with the HDS.
Turn the vehicle to the OFF (LOCK) mode, then to the ON mode.
Check for DTCs with the HDS.
Is DTC 121-11, 122-11, 123-11, or 1
