Honda HR-V: Torque Specifications
Honda HR-V (2015-2021) Service Manual / General Information / Torque Specifications
TORQUE SPECIFICATIONS (KA/KC MODELS)
NOTE:
- Refer to the appropriate portion of the manual for the precautions and complete procedures.
- Refer to the appropriate portion of the manual for the bolts/nuts not
indicated here.
- 1: Parts to be tightened in a particular order.
- 2: Follow the appropriate manual procedures closely for torque, sequence, and special steps.
- Power tools must be used appropriately.
- Follow instructions and precautions carefully per the tool's manufacturer.
- Do not use power tools for tightening. Only use them during removals of fasteners.
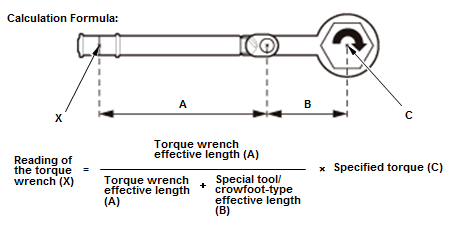
- When using some special tools or crowfoot-type wrenches, the torque
value changes due to the added leverage. The actual torque applied will be
greater than the torque
reading shown.
- The torque specification given is the actual torque, not the reading on the torque wrench.
- To compensate for this additional leverage, use the formula below to calculate the torque value reading on the torque wrench.
- Always use the special tool or crowfoot-type wrench in a straight line with the torque wrench, or you will apply improper torque.
Engine Electrical

Engine Mechanical
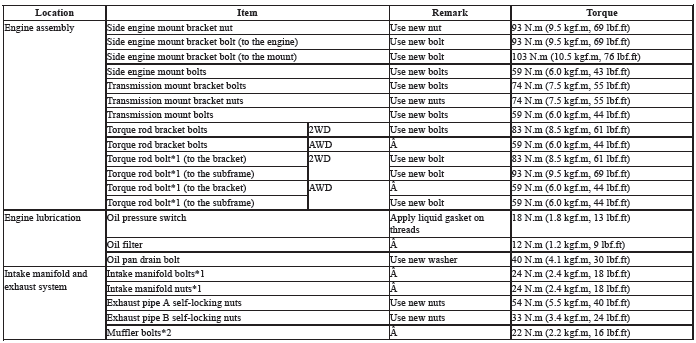
Engine Cooling

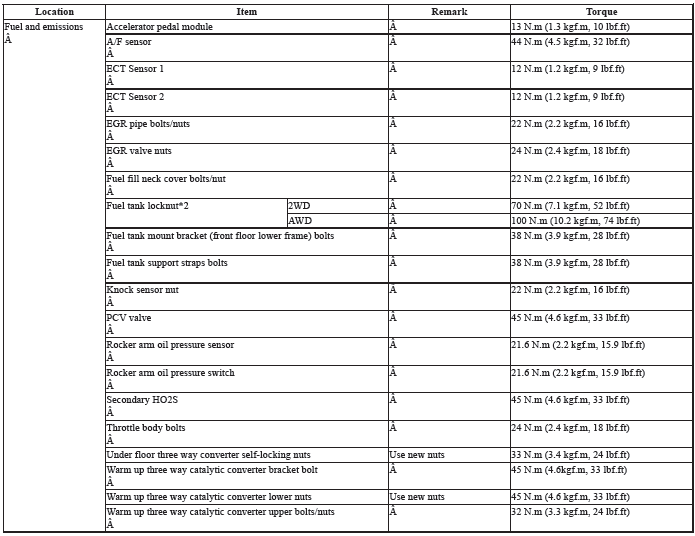
Fuel and Emissions
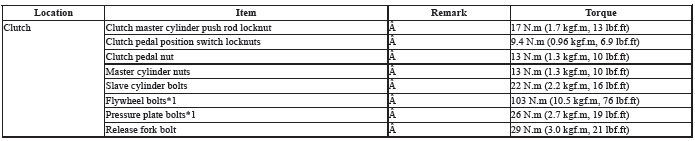
Clutch
Manual Transmission and M/T Differential

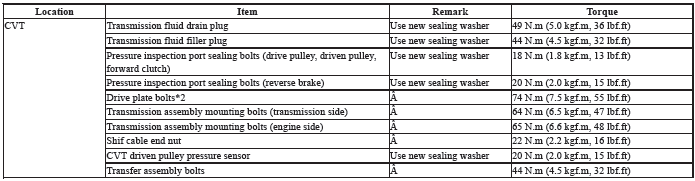
CVT and CVT Differential
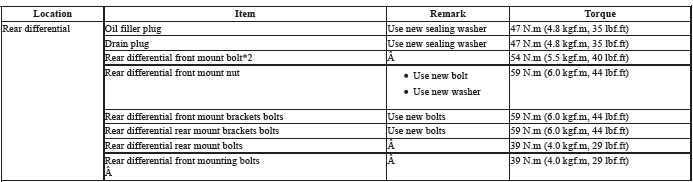
Rear Differential
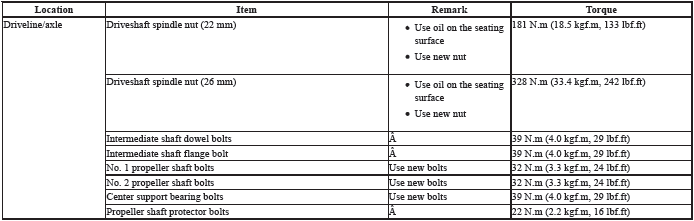
Driveline/Axle
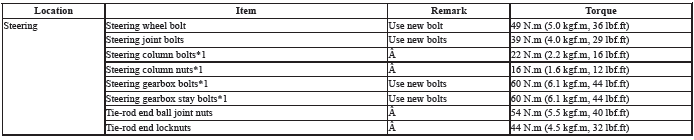
Steering
Suspension
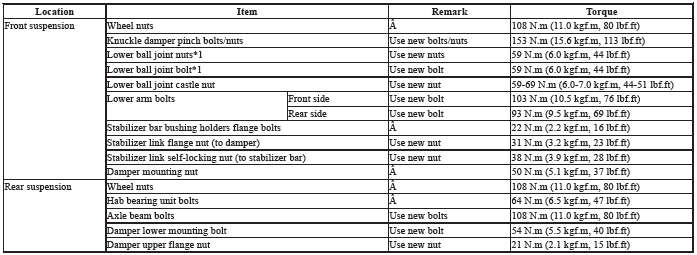
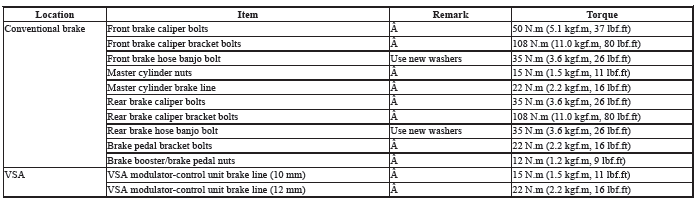
Brakes
Body

Heating, Ventilation, and Air Conditioning

Body Electrical


READ NEXT:
 Anti-Lock Brake Safety Precautions
* PLEASE READ THIS FIRST *
This article is intended for general information purposes only. This
information may not apply to all makes and
models. If vehicle is equipped with Anti-Lock Brake System (
ATEQ TPMS Reset Procedure
ATEQ TPMS RESET PROCEDURE
WITH INFORMATION DISPLAY
NOTE:
TPMS cannot be calibrated if a compact spare tire is installed.
The calibration process requires approximately 30 minutes of
cumulative
BARTEC TPMS Reset Procedure
Models With Information Display
1. Inflate tires to correct pressure.
2. Apply parking brake.
3. Turn Ignition ON.
4. Press and hold the TPMS button. The MIL will flash.
5. Release parking brake.
SEE MORE:
Keyless/Power Door Locks/Security System Symptom Troubleshooting - Security
Alarm System Will Not Arm
NOTE: Before troubleshooting, check the B-CAN DTCs. If any DTC is indicated,
troubleshoot the indicated
DTC first.
1. Switch information check:
Turn the vehicle to the ON mode.
Check the parameter(s) below with the HDS.
Is each switch information OK?
YES
Intermittent failure, the system is OK
HDMI Device Does Not Function (With Navigation)
NOTE:
Check the vehicle 12 volt battery condition first.
Check for B-CAN DTCs and resolve them before troubleshooting.
Before doing this troubleshooting, make sure whether a parking brake is
working properly and the electric parking brake indicator in the gauge
control module is being lit.
© 2019-2026 Copyright www.hohrv2.com
