Honda HR-V: Safety Messages
Your safety, and the safety of others, is very important. To help you make informed decisions, we have provided safety messages, and other safety information throughout this manual. Of course, it is not practical or possible to warn you about all the hazards associated with servicing this vehicle. You must use your own good judgment.
You will find important safety information in a variety of forms including:
- Safety Labels - on the vehicle.
- Safety Messages - preceded by a safety alert symbol (Honda Caution Symbol) and one of three signal words, DANGER, WARNING, or CAUTION.

- Instructions - how to service this vehicle correctly and safely
All information contained in this manual is based on the latest product information available at the time of printing. We reserve the right to make changes at anytime without notice. No part of this publication may be reproduced, or stored in a retrieval system, or transmitted, in any form by any means, electronic, mechanical, photocopying, recording, or otherwise, without the prior written permission of the publisher. This includes text, images, and tables.
As you read this manual, you will find information that is preceded by a (NOTICE) symbol. The purpose of this message is to help prevent damage to your vehicle, other property, or the environment.

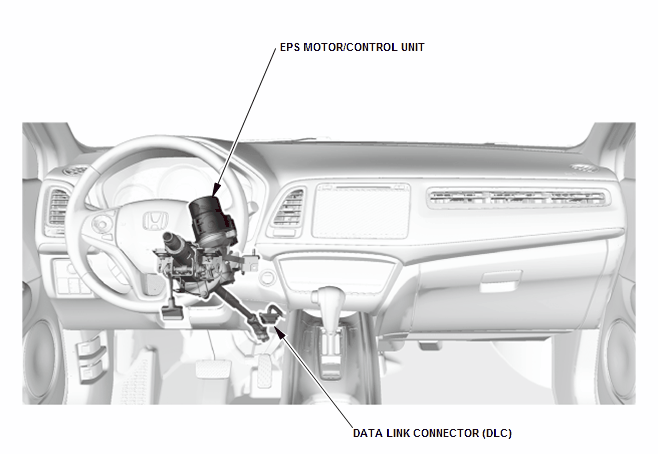
COMPONENT LOCATION INDEX
EPS COMPONENT LOCATION INDEX
READ NEXT:
 Service Specifications
SPECIFICATION TABLE
STANDARDS AND SERVICE LIMITS
Engine Electrical
Compression
Cylinder Head
Engine Block
Engine Lubrication
Cooling System
Fuel and Emissions
Clutch
Manual Transmission and
Torque Specifications
TORQUE SPECIFICATIONS (KA/KC MODELS)
NOTE:
Refer to the appropriate portion of the manual for the precautions and
complete procedures.
Refer to the appropriate portion of the manual for the bolts
Anti-Lock Brake Safety Precautions
* PLEASE READ THIS FIRST *
This article is intended for general information purposes only. This
information may not apply to all makes and
models. If vehicle is equipped with Anti-Lock Brake System (
SEE MORE:
Steering Wheel Removal and Installation
Removal
NOTE: SRS components are located in this area. Review the SRS component
locations - Refer to: SRS
Component Location Index (KA/KC), and the precautions and procedures before
doing repairs or service.
1. 12 Volt Battery Terminal - Disconnect
2. Driver's Airbag - Remove
3. Steering Wheel - R
Door Lock Knob Switch Test
Test
Driver's door
1. Driver's Door Panel - Remove
2. Driver's Door Lock Knob Switch - Test
Disconnect the connector (A).
Check for continuity between the terminals in each
switch position according to the table.
If the continuity is not as specified, the driver's door lock
knob switch is fa
