
Honda HR-V: Recommended Engine Oil
Honda HR-V (2015-2021) Owner's Manual / Maintenance / Maintenance Under the Hood / Recommended Engine Oil
- Genuine Honda Motor Oil
- Premium-grade 0W-20 detergent oil with an API Certification Seal on the container.
Oil is a major contributor to your engine's performance and longevity. If you drive the vehicle with insufficient or deteriorated oil, the engine may fail or be damaged.
This seal indicates the oil is energy conserving and that it meets the American Petroleum Institute's latest requirements.

Use a Genuine Honda Motor Oil or another commercial engine oil of suitable viscosity for the ambient temperature as shown.
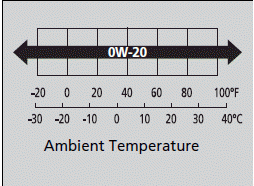
Engine Oil Additives
Your vehicle does not require oil additives. In fact, they may adversely affect the engine performance and durability.
■ Synthetic oil
You may also use synthetic motor oil if it is labeled with the API Certification Seal and is the specified viscosity grade.
READ NEXT:
 Oil Check
We recommend that you check the engine oil level every time you refuel.
Park the vehicle on level ground.
Wait approximately three minutes after turning the engine off before you check
the
oil.
1.
Changing the Engine Oil and Oil Filter
You must change the engine oil and oil filter regularly in order to maintain
the
engine's lubrication. The engine may be damaged if they are not changed
regularly.
Change the oil and filter in acco
Engine Coolant
Specified coolant: Honda Long Life Antifreeze/Coolant Type 2
This coolant is premixed with 50% antifreeze and 50% water. Do not add any
straight antifreeze or water.
We recommend you check the engine
SEE MORE:
Roof Molding Removal and Installation
Removal & Installation
1. Roof Molding - Remove
Apply the protective tape (A) to the body
Remove the front end of the roof molding (B) from the
pin (C).
Remove the roof molding (A).
Remove the rear end of the roof molding (A) from the
pin (B).
2. All Removed Parts - Install
Inst
Fuel Cap Adapter Removal and Installation
Removal & Installation
1. Rear Inner Fender - Remove (Left Side) - Refer to: Front Inner Fender
Removal and Installation, or
Rear Inner Fender Removal and Installation
2. Fuel Cap Adapter - Remove
Remove the fuel cap (A).
Remove the hose (A), then release the clips (B).
Remove the fu
© 2019-2026 Copyright www.hohrv2.com
