Honda HR-V: Description
ENGINE LUBRICATION SYSTEM DESCRIPTION - HYDRAULIC CIRCUIT
Overview
The lubrication method is a pressurized circulation type and it employs the full-flow filtering system. In the full-flow filtering system, all the oil supplied to the engine by the oil pump normally passes through the oil filter. It has excellent cleaning action.
Hydraulic Circuit
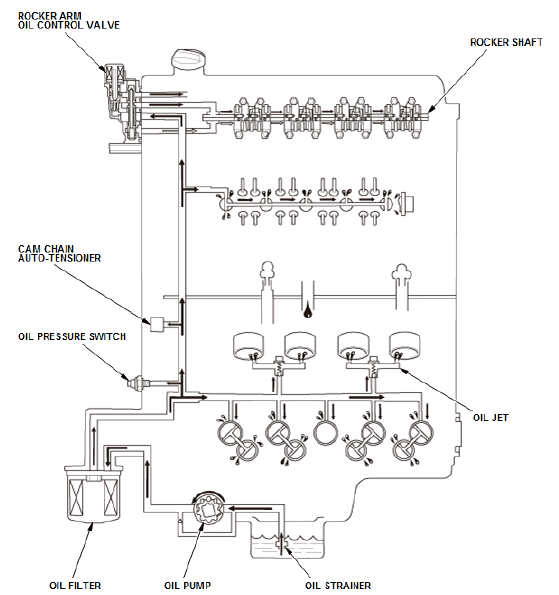
Fig. 1: Engine Lubrication Hydraulic Circuit
TESTING
ENGINE OIL PRESSURE SWITCH TEST
Test
1. Oil Pressure Switch - Test
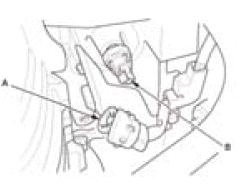
- Disconnect the connector (A)
- Check for continuity between the oil pressure switch terminal (B) and the engine (ground). There should be continuity with the engine stopped. There should be no continuity with the engine running
- Connect the connector.
ENGINE OIL PRESSURE TEST
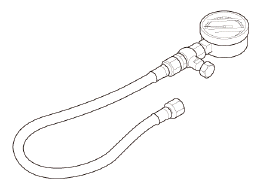
Special Tools Required
Oil Pressure Gauge Attachment 07406-0030000

Oil Pressure Gauge 07506-3000001
If the low oil pressure indicator stays on with the engine running, check the engine oil level. If the oil level is correct:
1. Oil Pressure Switch - Remove
2. Engine Oil Pressure - Test
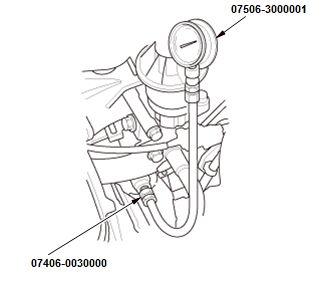
- Install the oil pressure gauge attachment and the oil pressure gauge
- Start the engine. Shut it off immediately if the gauge registers no oil pressure. Repair the problem before continuing
- Allow the engine to reach operating temperature (fan comes on at least twice). The pressure should be:
Engine Oil Temperature: 176 ºF (80 ºC)
At Idle: 106 kPa (1.08 kgf/cm2, 15.4 psi) min.
At 2, 000 RPM: 373 kPa (3.80 kgf/cm2, 54.0 psi) min.
- If the oil pressure is out of specifications, inspect these items:
- Oil filter blocked or plugged.
- Oil strainer blocked or plugged.
3. Oil Pressure Gauge Attachment and Oil Pressure Gauge - Remove
4. All Removed Parts - Install
- Install the parts in the reverse order of removal.
READ NEXT:
 Check
Check
ENGINE OIL LEVEL CHECK
Check
1. Engine Oil Level - Check
Park the vehicle on level ground, and start the engine. Hold the engine
speed at 3,
000 RPM with no load (M/T in neutral, CVT in P or N)
Symptom Troubleshooting
ENGINE LUBRICATION SYSTEM SYMPTOM TROUBLESHOOTING - LOW OIL PRESSURE
INDICATOR DOES NOT COME ON WITH THE VEHICLE IN THE ON MODE
1. Input signal test:
Connect the HDS to the DLC.
Turn the vehicle to
Starting System - Service Information
REMOVAL & INSTALLATION
ENGINE START/STOP SWITCH REMOVAL AND INSTALLATION
Removal and Installation
1. Dashboard switch Panel - Remove
2. Engine Start/Stop Switch - Remove
3. All Removed Parts - In
SEE MORE:
DTC C1860-98 (76-01): Differential Fluid Overheated (AWD)
NOTE:
Before you troubleshoot, review the General Troubleshooting Information
for the AWD with
intelligent control system.
When the clutch is presumed to be overheated, DTC C1860-98 is set and
the system turns off the clutch
engagement to protect the clutch. This DTC may also set under the
Synchro Sleeve and Hub Disassembly, Reassembly, and Inspection (M/T)
Inspection
1. Synchro Sleeve and Hub - Inspect
Inspect the gear teeth on all synchro hubs and synchro sleeves for wear
(rounded off
corners)
Install each synchro hub (A) in its mating synchro sleeve (B), and check
for free
movement. Make sure to match the three sets of longer teeth (C) (12
