Honda HR-V: Symptom Troubleshooting
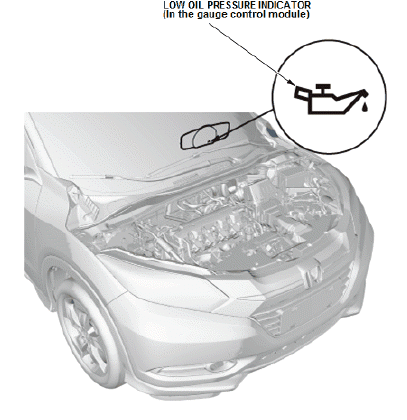
ENGINE LUBRICATION SYSTEM SYMPTOM TROUBLESHOOTING - LOW OIL PRESSURE INDICATOR DOES NOT COME ON WITH THE VEHICLE IN THE ON MODE
1. Input signal test:
- Connect the HDS to the DLC.
- Turn the vehicle to the ON mode.
- Make sure the HDS communicates with the vehicle. If it does not communicate, go to the DLC circuit troubleshooting.
- Check for DTCs - Refer to: How to Troubleshoot the Fuel and Emissions Systems, or How to Troubleshoot the CVT System (CVT). If a DTC is present, diagnose, and repair the cause before continuing with this test.
- Turn the vehicle to the ON mode, and check the parameter(s) below with the HDS.

Do the current condition(s) match the threshold?
YES
Replace the gauge control module.
NO
Go to step 2.
2. Oil pressure switch test:
- Turn the vehicle to the OFF (LOCK) mode.
- Check the oil pressure switch.
Is the oil pressure switch OK?
YES
Go to step 3.
NO
Replace the oil pressure switch
3. Open wire check (OIL PRESS SW line):
- Turn the vehicle to the OFF (LOCK) mode.
- Jump the SCS line with the HDS.
NOTE: This step must be done to protect the PCM from damage.
- Disconnect the following connectors.

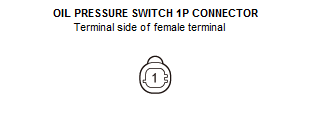
- Check for continuity between test points 1 and 2.


Is there continuity?
YES
Update the PCM if it does not have the latest software, or substitute a known-good PCM, then recheck. If the PCM was substituted, and the symptom/indication goes away, replace the original PCM.
NO
Repair an open in the OIL PRESS SW wire between the oil pressure switch and the PCM.
ENGINE LUBRICATION SYSTEM SYMPTOM TROUBLESHOOTING - LOW OIL PRESSURE INDICATOR STAYS ON
1. Input signal test:
- Connect the HDS to the DLC.
- Turn the vehicle to the ON mode.
- Make sure the HDS communicates with the vehicle. If it does not communicate, go to the DLC circuit troubleshooting.
- Check for DTCs - Refer to: How to Troubleshoot the Fuel and Emissions Systems, or How to Troubleshoot the CVT System (CVT). If a DTC is present, diagnose, and repair the cause before continuing with this test.
- Start the engine, and check the parameter(s) below with the HDS.

Do the current condition(s) match the threshold?
YES
Replace the gauge control module.
NO
Go to step 2.
2. Oil pressure switch test:
- Turn the vehicle to the OFF (LOCK) mode.
- Check the oil pressure switch.
Is the oil pressure switch OK?
YES
Go to step 3.
NO
Do the oil pressure test. If the oil pressure is OK, replace the oil pressure switch.
3. Shorted wire check (OIL PRESS SW line):
- Turn the vehicle to the OFF (LOCK) mode.
- Jump the SCS line with the HDS.
NOTE: This step must be done to protect the PCM from damage.
- Disconnect the following connectors.

- Check for continuity between test points 1 and 2.

Is there continuity?
YES
Repair a short to ground in the OIL PRESS SW wire between the oil pressure switch and the PCM.
NO
Update the PCM if it does not have the latest software, or substitute a known-good PCM, then recheck. If the PCM was substituted, and the symptom/indication goes away, replace the original PCM.
ENGINE LUBRICATION SYSTEM SYMPTOM TROUBLESHOOTING INDEX
CIRCUIT DIAGRAM
ENGINE LUBRICATION CIRCUIT DIAGRAM
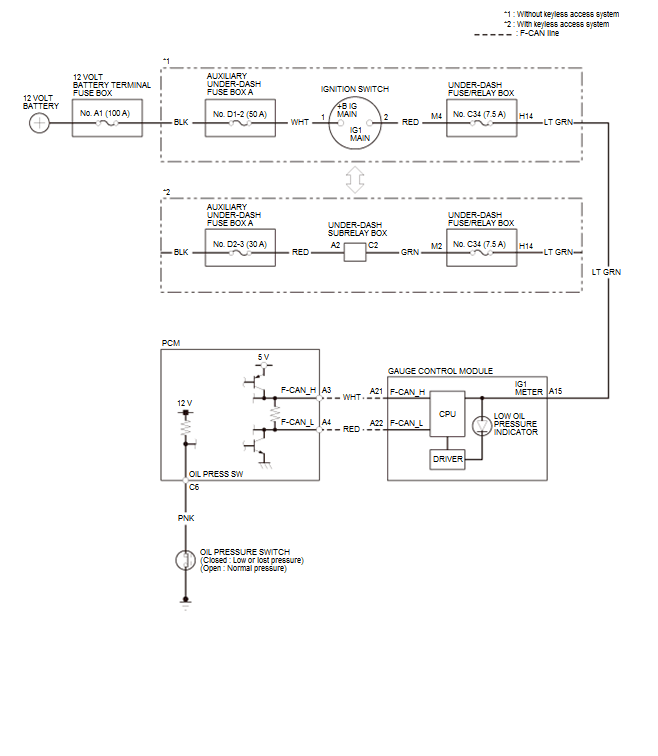
Fig. 2: Engine Lubrication Circuit Diagram
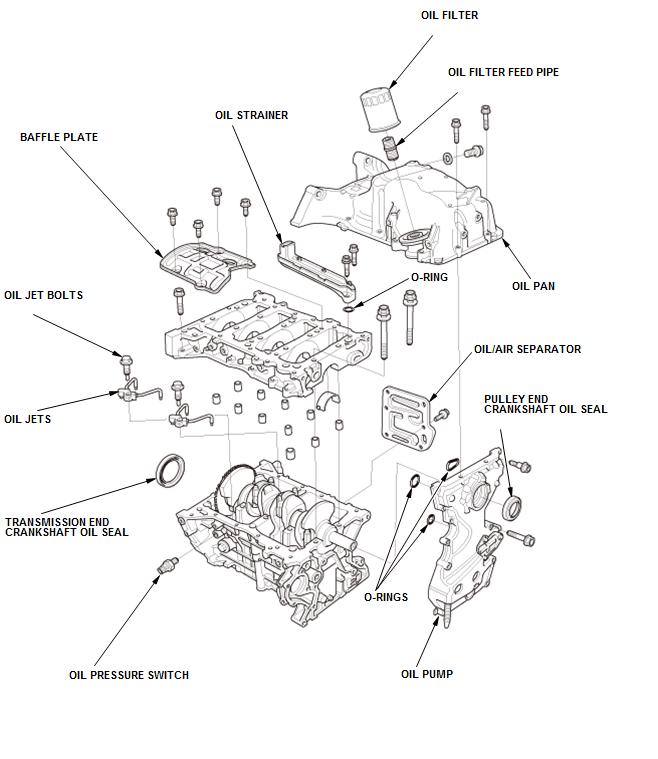
COMPONENT LOCATION INDEX
ENGINE LUBRICATION SYSTEM COMPONENT LOCATION INDEX
READ NEXT:
 Starting System - Service Information
REMOVAL & INSTALLATION
ENGINE START/STOP SWITCH REMOVAL AND INSTALLATION
Removal and Installation
1. Dashboard switch Panel - Remove
2. Engine Start/Stop Switch - Remove
3. All Removed Parts - In
Testing, Symptom Troubleshooting
TESTING
ENGINE START/STOP SWITCH TEST
Test
1. Dashboard switch Panel - Remove
2. Engine Start/Stop Switch - Test
Check the engine start/stop switch (A) according to the table.
NOTE:
When an
SEE MORE:
DTC Troubleshooting U0101-00: Lost Communication with the PCM (SRS
Unit)
NOTE:
Before doing this troubleshooting procedure, find out if the vehicle was
in a collision. If so, verify
that all the required components were replaced with new components of the
correct part number,
and that they were properly installed.
Before doing this troubleshooting procedure, rev
Disassembly and Reassembly
STEERING GEARBOX DISASSEMBLY AND REASSEMBLY
Exploded View
NOTE:
For these operations, refer to the complete procedure as needed.
Rack end removal and installation
Rack guide adjustment
Tie-rod end ball joint boot replacement
If the rack guide is removed, rack guide adjustment is necessary.
