Honda HR-V: Engine Oil Pressure Switch Removal and Installation
Removal
1. Oil Pressure Switch - Remove
.png)
- Disconnect the connector (A)
- Remove the oil pressure switch
- Remove any old liquid gasket from the oil pressure switch and the oil pressure switch mounting hole.
Installation
1. Oil Pressure Switch - Install

Fig. 1: Oil Pressure Switch With Torque Specifications
- Apply liquid gasket (P/N 08717-0004, 08718-0003, or 08718-0009) to the oil pressure switch threads. Install the component within 5 minutes of applying the liquid gasket.
NOTE:
- Using too much liquid gasket may cause liquid gasket to enter the oil passage or the end of the oil pressure switch.
- If too much time has passed after applying the liquid gasket, remove the old liquid gasket and residue, then reapply new liquid gasket.
- Install the oil pressure switch
- Connect the connector (A).
ENGINE OIL REPLACEMENT
Replacement
1. Engine - Warm Up
- Start the engine. Hold the engine speed at 3, 000 RPM with no load (M/T in neutral, CVT in P or N) until the radiator fan comes on, then let it idle.
2. Engine Undercover - Remove (With Engine Undercover)
3. Engine Oil - Drain
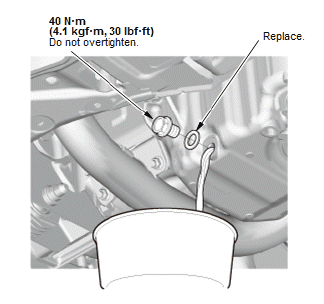
Fig. 2: Engine Oil Drain Bolt With Torque Specifications
- Remove the drain bolt, and drain the engine oil
- Reinstall the drain bolt with a new washer and torque to specification.
4. Engine Undercover - Install (With Engine Undercover)
5. Engine Oil - Refill

- Refill the engine with the recommended engine oil.
At Oil Change: 3.5 L (3.7 US qt)
At Oil Change including Filter: 3.7 L (3.9 US qt)
After Engine Overhaul: 4.5 L (4.8 US qt)
6. Engine Oil Level - Check
- Run the engine for more than 3 minutes, then check the oil level and the oil leakage.
7. Maintenance Minder - Reset (With Maintenance Minder System)
- If the Maintenance Minder required to replace the engine oil, reset the Maintenance Minder with the gauge (see "Resetting the Maintenance Minder"). If the Maintenance Minder did not require to replace the engine oil, reset the Maintenance Minder with the HDS (see "Resetting Individual Maintenance Items").
ENGINE OIL/AIR SEPARATOR REMOVAL AND INSTALLATION
Removal
1. Intake Manifold - Remove
2. Oil/Air Separator - Remove
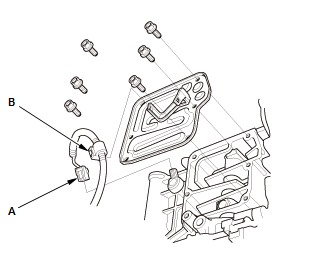
- Disconnect the connector (A)
- Remove the harness clamp (B)
- Remove the oil/air separator.
Installation
1. Oil/Air Separator - Install
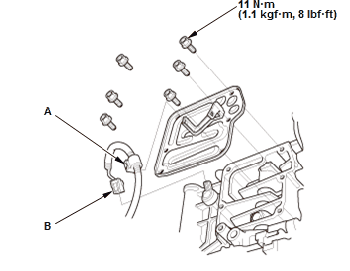
Fig. 3: Oil/Air Separator With Torque Specifications
- Apply liquid gasket to the engine block mating surface of the oil/air separator, and to the inside edge of the threaded bolt holes.
- Install the oil/air separator.
- Install the harness clamp (A).
- Connect the connector (B).
2. Intake Manifold - Install
READ NEXT:
 Description
ENGINE LUBRICATION SYSTEM DESCRIPTION - HYDRAULIC CIRCUIT
Overview
The lubrication method is a pressurized circulation type and it employs the
full-flow filtering system. In the
full-flow filtering s
Check
ENGINE OIL LEVEL CHECK
Check
1. Engine Oil Level - Check
Park the vehicle on level ground, and start the engine. Hold the engine
speed at 3,
000 RPM with no load (M/T in neutral, CVT in P or N)
SEE MORE:
Shift Lever Disassembly and Reassembly (CVT)
Exploded View
1. Shift Lever Assembly - Exploded View
NOTE: Do not wipe off the special grease applied to the area of the shift
lever marked with an asterisk (*).
Fig. 55: Exploded View Of Shift Lever Assembly With Torque Specifications
Disassembly & Reassembly
SRS components are located in th
Driver's Power Window Motor Test
Test
Motor Test
1. Driver's Door Panel - Remove
2. Driver's Power Window Motor - Test
Test the motor in each direction by connecting 12 volt battery power
and ground to the connector (A) according to the table. When the motor
stops running, disconnect 12 volt battery power immediately.
If th
