Honda HR-V: EVAP Canister Filter Removal and Installation(2WD)
Removal & Installation
1. EVAP Canister Filter - Remove
USA and Canada models
.png)
- Disconnect the hoses (A).
- Remove the EVAP canister filter (B).
Mexico models
.png)
2. All Removed Parts - Install
- Install the parts in the reverse order of removal.
EVAP CANISTER FILTER REMOVAL AND INSTALLATION (AWD)
Removal & Installation
1. EVAP Canister Filter - Remove
.png)
- Disconnect the connector (A) and the hoses (B).
- Remove the bracket (C) with the EVAP canister filter (D).
- Remove the EVAP canister filter (D) from the bracket (C).
- Renove the EVAP canister vent shut valve (E).
2. All Removed Parts - Install
- Install the parts in the reverse order of removal.
EVAP CANISTER PURGE VALVE REMOVAL AND INSTALLATION
Removal & Installation
1. EVAP Canister Purge Valve - Remove
.png)
- Disconnect the hose (A).
- Disconnect the connector (B)
- Remove the EVAP canister purge valve (C).
2. All Removed Parts - Install
- Install the parts in the reverse order of removal with a new O-ring.
EVAP CANISTER REMOVAL AND INSTALLATION (AWD)
Removal & Installation
1. EVAP Canister Assembly - Remove
.png)
- Remove the canister cover (A).
.png)
- Disconnect the fuel line quick-connect fitting (A).
- Press the tab (B) and disconnect the fuel vent hose (C).
.png)
- Disconnect the hoses (A).
- Disconnect the connector (B).
- Remove the EVAP canister assembly (C).
2. EVAP Canister - Remove
.png)
- Remove the FTP sensor (A).
- Remove the EVAP canister (B).
- Remove the FTP sensor subharness (C) if needed.
3. All Removed Parts - Install
EVAP CANISTER REMOVAL AND INSTALLATION (KA/KC)
Removal & Installation
1. Front Floor Undercover - Remove - Refer to: Rear Floor Undercover Removal and Installation (2WD), or Front Floor Undercover Removal and Installation (2WD)
2. EVAP Canister Assembly - Remove

- Disconnect the fuel line quick-connect fitting (A).
- Press the tab (B) and disconnect the fuel vent hose (C).
.png)
- Disconnect the hoses (A)
- Disconnect the connectors (B)
- Remove the EVAP canister assembly (C).
3. EVAP Canister - Remove
.png)
- Remove the FTP sensor (A).
- Remove the EVAP canister (B).
- Remove the FTP sensor subharness (C) and the EVAP canister vent shut valve (D) if needed.
4. All Removed Parts - Install
- Install the parts in the reverse order of removal.
EVAP CANISTER VENT SHUT VALVE REMOVAL AND INSTALLATION (KA/KC)
Removal & Installation
1. Front Floor Undercover (2WD) - Remove - Refer to: Rear Floor Undercover Removal and Installation (2WD), or Front Floor Undercover Removal and Installation (2WD)
2. EVAP Canister (2WD) - Remove - Refer to: EVAP Canister Removal and Installation (AWD), or EVAP Canister Removal and Installation (KA/KC)
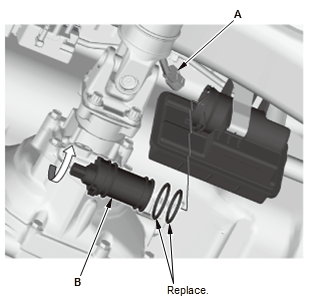
3. EVAP Canister Vent Shut Valve - Remove
.png)
2WD
- Disconnect the hose (A)
- Remove the EVAP canister vent shut valve (B).
AWD
- Disconnect the connector (A)
- Remove the EVAP canister vent shut valve (B).
4. EVAP Canister Vent Shut Valve (2WD) - Disassembly
.png)
5. All Removed Parts - Install
1. Install the parts in the reverse order of removal with new O-rings.
READ NEXT:
 Engine Assembly Torque Rod Removal and Installation
Removal & Installation
1. Engine Undercover - Remove (With Engine Undercover)
2. Engine - Support
Lift and support the engine with a transmission jack and a wood block
under the oil pan.
3. T
Engine Oil Pan Removal and Installation
Removal
1. Right Front Wheel - Remove
2. Front Splash Shield and Engine Undercover (With Engine Undercover) -
Remove
3. Drive Belt - Remove
4. A/C Compressor - Move
NOTE:
Do not disconnect the A/C
Engine Oil Pump Removal and Installation
Removal
1. Right Front Wheel - Remove
2. Front Splash Shield and Engine Undercover (With Engine Undercover) -
Remove
3. Drive Belt Auto-Tensioner - Remove
4. Drive Belt Idler Pulley Base - Remove
5.
SEE MORE:
Inspection/Adjustment
WATER PUMP INSPECTION
Inspection
1. Water Pump Pulley Mounting Bolt - Loosen
Loosen the bolts (A).
2. Drive Belt - Remove
3. Water Pump Pulley - Remove
4. Water Pump - Inspect
Turn the water pump flange counterclockwise, and check that it turns
freely. If it does not turn freely, replace t
DTC Troubleshooting B0079-1A: Decreased Resistance in the Driver's Seat Belt
Outer Lap Tensioner
Special Tools Required
*SRS Inflator Simulator 07SAZ-TB4011A
*SRS Simulator Lead M 070AZ-SNA0400
*SRS Short Canceller 070AZ-SAA0100
NOTE:
Before doing this troubleshooting procedure, find out if the vehicle was
in a collision. If so, verify
that all the required components were replaced with ne
