Honda HR-V: Starter System Circuit Troubleshooting (With Keyless Access System)
NOTE:
- Air temperature must be between 59-100ºF (15-38ºC) during this procedure.
- After the inspection, you must reset the PCM. Otherwise, the PCM will continue to stop the fuel injectors from operating.
- The 12 volt battery must be in good condition and fully charged.
1. PGM-FI, CVT, and Keyless Access Control system DTC check.
- Connect the HDS to the DLC.
- Turn the vehicle to the ON mode.
- Make sure the HDS communicates with the vehicle. If it does not communicate, go to the DLC circuit troubleshooting.
- Check for PGM-FI, CVT, and Keyless Access Control system DTCs with the HDS. If you fail to enter the SYSTEM SELECTION MENU with the HDS, go to the keyless access system symptom troubleshooting "Cannot select ON mode with keyless access and with the keyless remote touching the engine start/stop switch" - Refer to: Keyless Access System Symptom Troubleshooting - Cannot select ON mode with keyless access and with the keyless remote touching the engine start/stop switch
PGM-FI system

CVT system

Keyless Access Control system

Are any DTCs indicated?
YES
Go to the indicated DTC's troubleshooting.
NO
Go to step 2.
2. Starting system check 1.
- Select ALL INJECTORS STOP in the PGM-FI INSPECTION menu with the HDS.
ALL INJECTORS STOP
- With the transmission in neutral (M/T), P or N (CVT), and with the clutch pedal (M/T) or the brake pedal (CVT) pressed, turn the vehicle to the START mode to crank the engine.
Did the starter crank the engine?
YES
Do the PCM reset in the PGM-FI system to cancel ALL INJECTORS STOP with the HDS.
NO
Go to step 3.
3. Starting system check 2.
- Turn the vehicle to the OFF (LOCK) mode.
- Check the 12 volt battery condition. Check the electrical connections at
the 12 volt battery, the 12 volt
battery negative cable to the body, the engine ground cables, and the
starter for looseness and corrosion.
Then try starting the engine again.
Did the starter crank the engine?
Starter cranks normally
Repairing the loose connection corrected the problem. Do the PCM reset in the PGM-FI system to cancel ALL INJECTORS STOP with the HDS.
Starter does not crank engine at all
If the starter does not crank the engine at all, go to step 4.
Starter cranks abnormally
If the starter cranks the engine erratically or too slowly, go to step 6.
Starter overruns
If the starter does not disengage from the flywheel ring gear (M/T) or the torque converter ring gear (CVT) when you release the button, replace the starter, or remove and disassemble it, and check for the following:
- Dirty drive gear or damaged overrunning clutch
- Damaged flywheel ring gear (M/T) or torque converter ring gear (CVT)
4. Fuse check.
- Check the following fuses.

Are the fuses OK?
YES
Reinstall the fuses, then go to step 5.
NO
Replace the fuse(s), and recheck. If the fuse(s) blows again, repair the short to ground on the No. B6 (10 A) and/or the No. C26 (7.5 A) fuse circuit(s).
5. Determine possible failure area (starter, starter circuit).
- Make sure the transmission is in neutral (M/T), P or N (CVT).
- Disconnect the following connector.
Starter S terminal 1P connector (A)

- Connect terminals A and B with a jumper wire.

Did the starter crank the engine?
- YES
Check the following items in the order listed until you find the problem in the circuit:
- Check for an open in the wire and connectors between the under-dash fuse/relay box and starter cut relay 1 and/or starter cut relay 2.
- Check for an open in the wire and connectors between starter cut relay 2 and the starter.
- Check for an open or short in the wire and connectors between the PCM and clutch pedal position switch A. (M/T)
- Check for poor connections or loose terminals at clutch pedal position switch A and ground G302. (M/T)
- Check for an open or short in the wire and connectors between the PCM and the transmission range switch. (CVT)
- Check for an open or short in the wire and connectors between the keyless access control unit and the transmission range switch. (CVT)
- Check for poor connections or loose terminals at the transmission range switch and body ground G101. (CVT)
- Check for an open in the wire and connectors between the under-hood fuse/relay box and the brake pedal position switch.
- Check for an open in the wire and connectors between the brake pedal position switch and the PCM.
- Check for an open in the wire and connectors between the brake pedal position switch and the keyless access control unit. (CVT)
- Check for a faulty engine start/stop switch.
- Check for faulty starter cut relay 1 and starter cut relay 2.
- Check for faulty clutch pedal position switch A. (M/T)
- Check for faulty transmission range switch. (CVT)
- Check for a faulty brake pedal position switch.
NO
Check for an open or short in the wire and connectors between the 12 volt battery and the starter.
Replace the starter, or remove and disassemble it, as necessary.
6. Starter test.
- Connect the following equipment:
- Ammeter, 0-400 A
- Voltmeter, 0-20 V (accurate within 0.1 V)
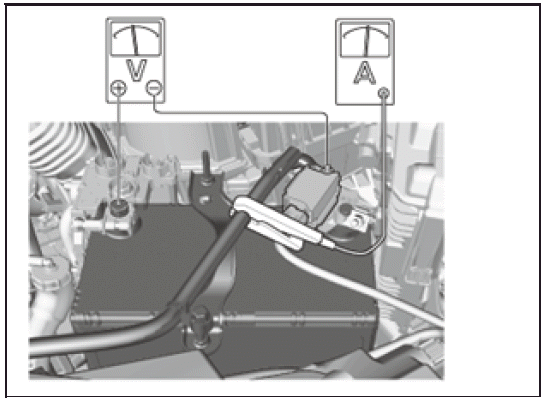
- Do the STARTING TEST, check the cranking voltage and the current draw from the following service limit table.

Are the cranking voltage and the current draw within the service limits?
YES
Remove the starter, and inspect its drive gear and the flywheel ring gear (M/T) or the torque converter ring gear (CVT) for damage. Replace any damaged parts.
NO
Replace the starter or remove and disassemble it, and check for these problems:
- Drag in the starter armature
- Shorted armature winding
- Excessive drag in the engine
- Open circuit in the starter armature commutator segments
- Excessively worn starter brushes
- Open circuit in the starter brushes
- Dirty or damaged helical splines or drive gear
- Faulty overrunning clutch
READ NEXT:
 Starter System Circuit Troubleshooting (Without Keyless Access System)
NOTE:
Air temperature must be between 59-100ºF (15-38ºC) during this
procedure.
After the inspection, you must reset the PCM. Otherwise, the PCM will
continue to stop the fuel
injectors
Overhaul
STARTER OVERHAUL
Exploded View
NOTE: Do not wipe off the special grease applied to the area of the starter
marked with an asterisk (*) when
you disassemble or assemble it.
1. Starter - Exploded View
EGR Function Testing
TEST 1
1980-87 (PORTED EGR VALVE)
Check vacuum hoses for correct routing. Disconnect vacuum hose from EGR
valve. Run engine to operating
temperature. Apply 6 in. Hg to EGR valve. Ensure engine runs r
SEE MORE:
Timing Gears
* PLEASE READ THIS FIRST *
NOTE: Examples used in this article are general in nature and do not
necessarily relate to a specific engine or system. Illustrations and procedures
have been chosen
to guide mechanic through engine overhaul process. Descriptions of processes
of cleaning, inspection, ass
DTC U1281, U128D (Keyless Access Power Control Unit)
NOTE:
Refer to the DTC code shown on the display, and then inspect the
connectors and terminals based on the instructions in the table below.
The DTC may be stored due to the grounding failure or the power source
failure at the transmitting
control unit (the grounding inspection and the powe
