Honda HR-V: Synchro Sleeve and Hub Disassembly, Reassembly, and Inspection (M/T)
Honda HR-V (2015-2021) Service Manual / Transmission / Manual Transaxle - Testing & Troubleshooting / Overhaul / Synchro Sleeve and Hub Disassembly, Reassembly, and Inspection (M/T)
Inspection
1. Synchro Sleeve and Hub - Inspect
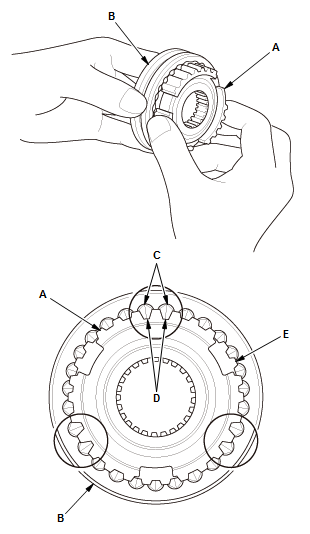
- Inspect the gear teeth on all synchro hubs and synchro sleeves for wear (rounded off corners)
- Install each synchro hub (A) in its mating synchro sleeve (B), and check
for free
movement. Make sure to match the three sets of longer teeth (C) (120 degrees
apart)
on the synchro sleeve with the three sets of deeper grooves (D) in the
synchro hub.
NOTE:
- Do not install the synchro sleeve with its longer teeth in the synchro hub slots (E) because it will damage the spring ring.
- If replacement is required, always replace the synchro sleeve and the synchro hub as a set.
READ NEXT:
 DTC C1840-12 (47-01): Differential Fluid Pressure Sensor Circuit
High Voltage
(AWD)
DTC C1840-12 (47-01): Differential Fluid Pressure Sensor Circuit
High Voltage
(AWD)
NOTE: Before you troubleshoot, review the General Troubleshooting Information
for the AWD with
intelligent control system.
1. Determine possible failure area (electrical circuit problem, hydraulic
SEE MORE:
Shifting (Manual transmission models)
■Shift Lever Operation
Fully depress the clutch pedal to operate the shift lever and change gears,
then
slowly release the pedal.
Depress the clutch pedal, and pause for a few seconds before shifting into (R),
or
shift into one of the forward gears for a moment. This stops the gears so they
do
DTC B0020-1A
Special Tools Required
SRS Inflator Simulator 07SAZ-TB4011A
SRS Simulator Lead L 070AZ-SNAA300
SRS Short Canceller 070AZ-SAA0100
NOTE:
Before doing this troubleshooting procedure, find out if the vehicle was
in a collision. If so, verify
that all the required components were replaced with
© 2019-2026 Copyright www.hohrv2.com
