
Honda HR-V: DTC Troubleshooting B280A-87: No Signal From the Rear Safing Sensor
NOTE:
- Before doing this troubleshooting procedure, find out if the vehicle was in a collision. If so, verify that all the required components were replaced with new components, of the correct part number, and that they were properly installed.
- Before doing this troubleshooting procedure, review SRS Precautions and Procedures, General Troubleshooting Information, and 12 Volt Battery Terminal Disconnection and Reconnection.
- Before replacing the SRS unit, check the SRS unit software version with the HDS. If the software version is not the latest, update the SRS unit software, and retest.

1. Problem verification:
- Clear the DTCs with the HDS.
- Turn the vehicle to the ON mode, then wait for 10 seconds.
- Check for DTCs with the HDS.

Is DTC B280A-87 indicated?
YES
The failure is duplicated. Go to step 2.
NO
Intermittent failure, the system is OK at this time. Go to Troubleshooting Intermittent Failures. If another DTC is indicated, troubleshoot the DTC.
2. Connector connection check:
- Turn the vehicle to the OFF (LOCK) mode.
- Check the following connector connections.
SRS unit connector B (39P)
Rear safing sensor 2P connector (on the floor wire harness)
Are the connectors OK?
YES
Go to step 4.
NO
Go to step 3.
3. System check:
- Repair the poor connector connections whichever was the cause of the problem in step 2.
- Clear the DTCs with the HDS.
- Turn the vehicle to the ON mode, then wait for 10 seconds.
- Check for DTCs with the HDS.

Is DTC B280A-87 indicated?
YES
Turn the vehicle to the OFF (LOCK) mode, then go to step 4.
NO
The system is OK at this time.
4. Shorted wire check (SSS+ line to SSS- line):
- Disconnect the negative cable from the battery, then wait at least 3 minutes.
- Disconnect the following connectors.
SRS unit connector B (39P)
Rear safing sensor 2P connector (on the floor wire harness)
- Measure the resistance between test points 1 and 2.

Is there an open circuit, or at least 1 MΩ?
YES
The SSS+ and SSS- wires are not shorted. Go to step 5.
NO
Short to another wire in the floor wire harness; replace the floor wire harness, then clear the DTC.
5. Shorted wire check (SSS+, SSS- lines):
Measure the resistance between test points 1 and 2.
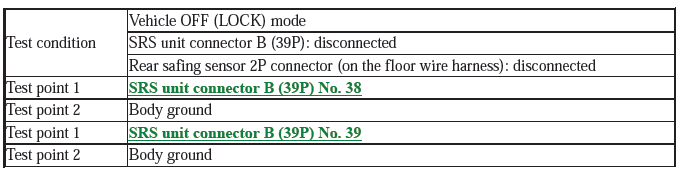
Is there an open circuit, or at least 1 MΩ?
YES
The SSS+ and SSS- wires are not shorted. Go to step 6.
NO
Short to ground in the floor wire harness; replace the floor wire harness, then clear the DTC.
6. Shorted wire check (SSS+, SSS- lines to power):
- Reconnect the negative cable to the 12 volt battery.
- Turn the vehicle to the ON mode.
- Measure the voltage between test points 1 and 2.
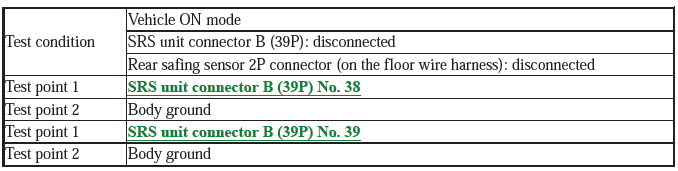
Is there 0.2 V or less?
YES
The SSS+ and SSS- wires are not shorted to power. Go to step 7.
NO
Short to power in the floor wire harness; replace the floor wire harness, then clear the DTC.
7. Open wire check (SSS+, SSS- lines):
- Turn the vehicle to the OFF (LOCK) mode.
- Connect terminals A and B with a jumper wire.

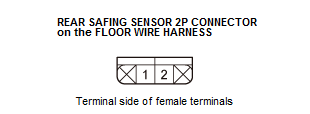
- Measure the resistance between test points 1 and 2.
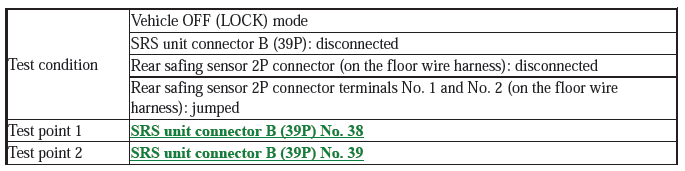
Is there 1.0 Ω or less?
YES
The SSS+ and SSS- wires are OK. Replace the rear safing sensor, then clear the DTC, and retest. If the DTC is still present, replace the SRS unit.
NO
Open in the floor wire harness; replace the floor wire harness, then clear the DTC.
READ NEXT:
 DTC Troubleshooting B2840-13, B2841-13: SRS Unit Connector Not
Properly Installed
DTC Troubleshooting B2840-13, B2841-13: SRS Unit Connector Not
Properly Installed
NOTE:
Before doing this troubleshooting procedure, find out if the vehicle was
in a collision. If so, verify
that all the required components were replaced with new components of the
correct pa
DTC Troubleshooting U0101-00: Lost Communication with the PCM (SRS
Unit)
NOTE:
Before doing this troubleshooting procedure, find out if the vehicle was
in a collision. If so, verify
that all the required components were replaced with new components of the
correct pa
DTC Troubleshooting U0155-00: Lost Communication with the Gauge
Control
MODULE (SRS Unit)
NOTE:
Before doing this troubleshooting procedure, find out if the vehicle was
in a collision. If so, verify
that all the required components were replaced with new components of the
correct pa
SEE MORE:
DTC Troubleshooting 84-91: Front Passenger's Weight Sensor Not
Calibrated
NOTE:
Before doing this troubleshooting procedure, find out if the vehicle was
in a collision. If so, verify that all the required components were replaced
with new
components of the correct part number, and that they were properly
installed.
Before doing this troubleshooting procedure, re
DTC Advanced Diagnostics
DTC ADVANCED DIAGNOSTICS SRS RELATED DTCS
NOTE
Always check "How to troubleshoot the SRS system" and proceed along each
"DTC Troubleshooting" procedure.
Make sure the 12 volt battery is fully charged. If not, the results of
tests may not be accurate.
The SRS indicator will turn on when the b
