Honda HR-V: Injector Removal and Installation
Honda HR-V (2015-2021) Service Manual / Engine / Engine Control System & Engine Mechanical - Service Information / Injector Removal and Installation
Removal
1. Fuel Pressure - Relieve
2. Fuel Injector and Rail Assembly - Remove
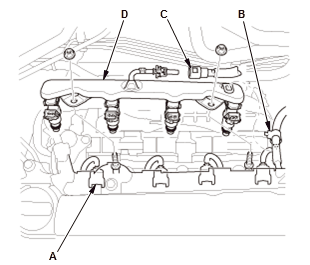
- Disconnect the injector connectors (A).
- Remove the harness clamp (B).
- Disconnect the quick-connect fitting (C).
- Remove the injectors and the fuel rail (D) together.
3. Fuel Injector - Remove
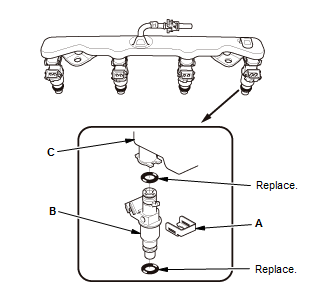
- Remove the injector clips (A) from the injectors (B)
- Remove the injectors from the fuel rail (C).
Installation
1. Fuel Injector - Install
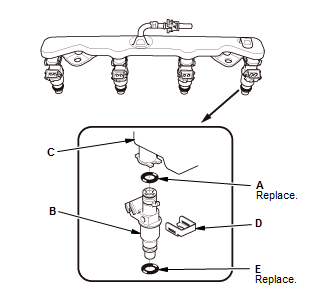
- Coat the new O-rings (black) (A) with clean engine oil, and insert the injectors (B) into the fuel rail (C)
- Install the injector clips (D)
- Coat the new injector O-rings (brown) (E) with clean engine oil.
2. Fuel Injector and Rail Assembly - Install
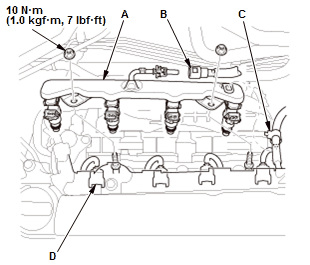
- Install the injectors and the fuel rail (A) together.
- Connect the quick-connect fitting (B).
- Install the harness clamp (C).
- Connect the injector connectors (D).
3. Fuel Leak - Check
- Turn the vehicle to the ON mode, but do not start the engine. After the fuel pump runs for about 2 seconds, the fuel rail will be pressurized. Repeat this two or three times, then check for fuel leakage.
READ NEXT:
 Intake Air Resonator Removal and Installation
Removal & Installation
1. Air Intake Duct - Remove
2. Intake Air Resonator Mounting Bolt - Remove
3. Left Front Splash Shield - Remove
4. Left Front Inner Fender - Remove - Refer to: Front Inner
Knock Sensor Removal and Installation
Removal & Installation
1. Intake Manifold - Remove
2. Knock Sensor - Remove
Fig. 28: Knock Sensor Location With Torque Specifications
Disconnect the connector (A)
Remove the knock sensor (B).
PCM Removal and Installation
Removal
NOTE:
Make sure the HDS or the MVCI has the latest HDS software version.
If you are replacing the PCM after substituting a known-good PCM,
reinstall the original PCM, then do
this proced
SEE MORE:
Paddle Shifter Removal and Installation (CVT)
Removal and Installation
SRS components are located in this area. Review the SRS component locations -
Refer to: SRS Component
Location Index (KA/KC), or SRS Component Location Index (KA/KC) and the
precautions and
procedures before doing repair or service.
Paddle Shifter + (Upshift Switch)
1. Dri
DTC Troubleshooting B00B5-11: Short or Decreased Resistance in the
Driver's Seat Position Sensor
NOTE:
Before doing this troubleshooting procedure, find out if the vehicle was
in a collision. If so, verify
that all the required components were replaced with new components of the
correct part number,
and that they were properly installed.
Before doing this troubleshooting procedure, rev
© 2019-2026 Copyright www.hohrv2.com
