Honda HR-V: PCM Removal and Installation
Removal
NOTE:
- Make sure the HDS or the MVCI has the latest HDS software version.
- If you are replacing the PCM after substituting a known-good PCM, reinstall the original PCM, then do this procedure.
- If you are removing or substituting the PCM, skip the procedures of READ DATA (Engine Oil Life).
1. HDS - Connect
2. READ DATA (Engine Oil Life) - Select (USA and Canada Models)
- Select the PGM-FI system with the HDS
- Select the REPLACE PCM MENU, then select READ DATA, and follow the
screen
prompts.
NOTE :- Doing this step copies (READS) the engine oil life data from the original PCM so you can later download (WRITES) them into the new PCM.
- If the READ DATA indicates FAILED, continue with this procedure.
3. SCS - Short
- Jump the SCS line with the HDS
- Turn the vehicle to the OFF (LOCK) mode.
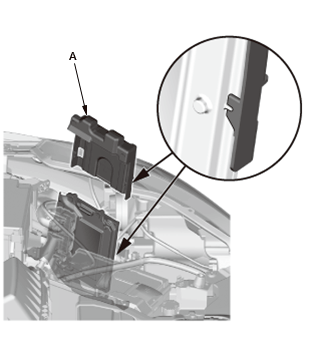
4. PCM - Remove

- Remove the PCM cover (A).
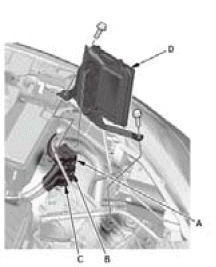
- Disconnect PCM connectors A, B, and C.
NOTE : PCM connectors A, B, and C have symbols (A=□, B=Δ, C=◦) embossed on them for identification - Remove the PCM (D).
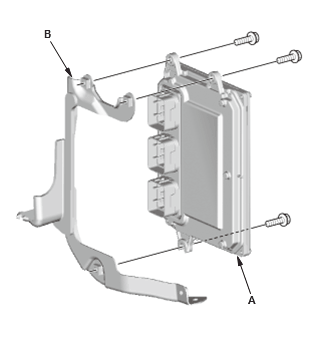
- Remove the PCM (A) from the PCM bracket (B).
Installation
NOTE:
- If you are removing the PCM, skip the procedures of using the HDS.
- If you are substituting the PCM, skip the procedures of WRITE DATA (Engine Oil Life).
1. PCM - Install
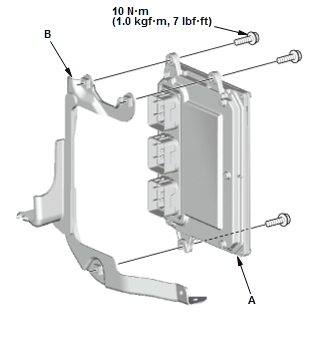
- Install the PCM (A) to the PCM bracket (B).
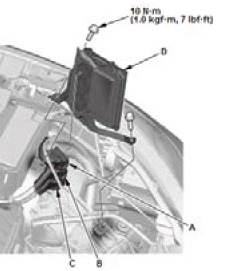
- Install the PCM (D)
- Connect PCM connectors A, B, and C.
NOTE : PCM connectors A, B, and C have symbols (A=□, B=Δ, C=◦) embossed on them for identification.
- Install the PCM cover (A).
2. SCS - Open
- Exit the SCS mode with the HDS.
Procedure After Replacing PCM
3. VIN - Input
- Turn the vehicle to the ON mode.
NOTE : DTC P0630 VIN Not Programmed or Mismatch may be stored because the VIN has not been programmed into the PCM; ignore it, and continue this procedure - Manually input the VIN to the PCM with the HDS.
4. WRITE DATA (Engine Oil Life) - Select (USA and Canada Models)
NOTE: If the READ DATA (engine oil life) failed in "READ DATA (Engine Oil Life) - Select", skip this procedure.
- Select the REPLACE PCM MENU, then select WRITE DATA, and follow the screen prompts.
5. Other Procedures for PCM Replacement - Do (USA and Canada Models)
- If the READ DATA (engine oil life) failed in "READ DATA (Engine Oil Life) - Select", replace the engine oil and the engine oil filter.
6. IMMOBI SYSTEM - Registration
- Without keyless access system.
- With keyless access system.
7. DTC - Clear
Clear the Pending or Confirmed DTCs with the HDS.
8. PCM - Update
9. PCM - Idle Learn
10.CKP Pattern - Clear/Learn
PCV VALVE REMOVAL AND INSTALLATION
Removal & Installation
1. PCV Valve - Remove
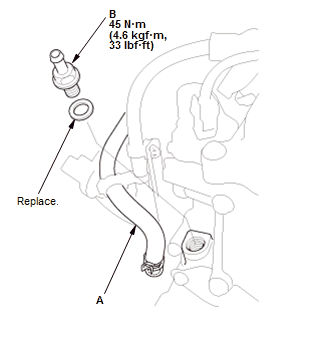
Fig. 29: PCV Valve Location With Torque Specifications
- Disconnect the PCV hose (A)
- Remove the PCV valve (B).
2. All Removed Parts - Install
- Install the parts in the reverse order of removal with a new washer.
READ NEXT:
 Piston, Ring, Pin, and Connecting Rod Removal and Installation
Removal
1. Crankshaft - Remove
2. Oil Jet - Remove
3. Metal or Hard Carbon - Remove
If you can feel a ridge of metal or hard carbon around the top of each
cylinder,
remove it with a ridge reamer
Pulley End Crankshaft Oil Seal Replacement - In Car
Special Tools Required
Driver Handle, 15
x 135L
07749-0010000
Hub
Dis/Assembly
Tool, 42 mm
07GAF-SD40200
Replacement
1. Oil Pump - Remove
2. Pulley End Crankshaft Oil Seal - Remove
3. Pulley End Cr
Rocker Arm Assembly Removal and Installation
Removal
1. Cylinder Head Cover - Remove
2. Rocker Arm Assembly - Remove
Loosen the locknuts and the adjusting screws (A).
Fig. 32: Lost Motion Holder Bolt Removal Sequence
Remove the lost motio
SEE MORE:
Front Airbags (SRS)
The front SRS airbags inflate in a moderate-to-severe frontal collision to
help protect
the head and chest of the driver and/or front passenger.
SRS (Supplemental Restraint System) indicates that the airbags are designed to
supplement seat belts, not replace them. Seat belts are the occupant's pri
DTC B1646, B1648, B1660, B1664 Antenna Circuit Open
NOTE: Refer to the DTC code shown on the display, and then inspect the
connectors and terminals based on
the instructions in the table below.
DTC (Keyless Access Control Unit)
NOTE: If you are troubleshooting multiple DTCs, be sure to
follow the instructions in B-CAN System Diagnosis Test Mode A
