Honda HR-V: Throttle Body Removal and Installation
Removal

Do not insert your fingers into the installed throttle body when you turn the vehicle to the ON mode, or while the vehicle is in ON mode. If you do, you will seriously injure your fingers if the throttle valve is activated.
NOTE: If you are replacing the throttle body, start at 1st procedure (HDS - Connect). If you are removing the throttle body, start at 3rd procedure (Throttle Body - Remove).
1. HDS - Connect
2. TP POSITION CHECK - Do
- Select the INSPECTION MENU on the HDS
- Do the TP POSITION CHECK in the ETCS TEST
- Turn the vehicle to the OFF (LOCK) mode
- Turn the vehicle to the ON mode, and wait 2 seconds without pressing the accelerator pedal
- Turn the vehicle to the OFF (LOCK) mode
3. Air Cleaner - Remove
4. Throttle Body - Remove
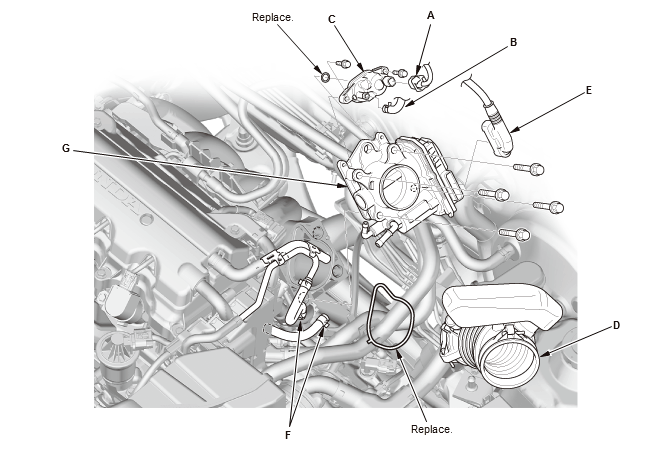
- Remove the intake air duct (D)
- Disconnect the throttle body connector (E)
- Disconnect and plug the water bypass hoses (F) from the throttle body
- Remove the throttle body (G).
Installation
Do not insert your fingers into the installed throttle body when you press the engine start/stop button to select the ON mode, or while the vehicle is in the ON mode. If you do, you will seriously injure your fingers if the throttle valve is activated.
1. Throttle Body - Install
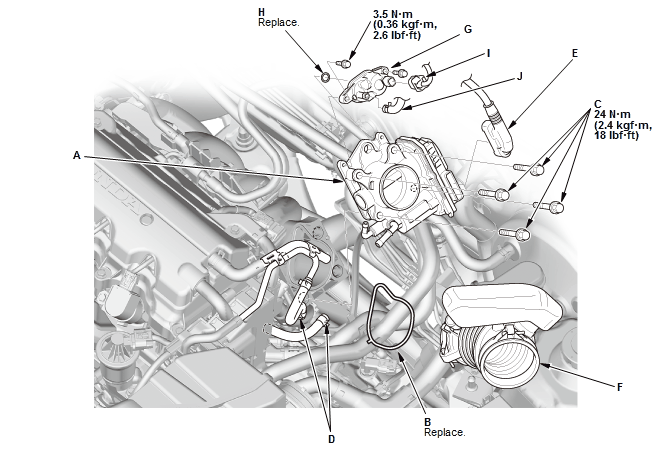
Fig. 36: Throttle Body Exploded View With Torque Specifications
- Tighten the bolts (C) in a cross pattern in three steps; tighten the bolts until the bolts sit on the throttle body, tighten the bolts until the gasket is compressed and both parts are contacted, tighten the bolts to specified torque
- Connect the water bypass hoses (D) to the throttle body
- Connect the throttle body connector (E)
- Install the intake air duct (F)
- Install the EVAP canister purge valve (G) with a new O-ring (H), then connect the connector (I)
- Connect the vacuum hose (J) to the EVAP canister purge valve.
2. Air Cleaner - Install
3. Engine Coolant - Refill
4. PCM - Reset
5. PCM - Idle Learn
READ NEXT:
 Transmission End Crankshaft Oil Seal Replacement - In Car
Special Tools Required
Driver Handle, 15
x 135L
07749-0010000
Oil Seal Driver
Attachment, 96
mm 07ZADPNAA100
Replacement
1. Transmission - Remove
Remove the transmission:
M/T
CVT
2. Press
Valve Guide Replacement
Special Tools Required
Valve Guide
Driver, 5.35 x 9.7
mm
07742-0010100
Valve Guide
Reamer, 5.5 mm
07HAH-PJ7A100
Replacement
1. Valve, Valve Seal, and Valve Spring Seat - Remove
2. Valve Guide - Remo
Valve, Spring, and Valve Seal Removal and Installation
Special Tools Required
Valve Spring
Compressor
Attachment
07757-PJ1010A
Stem Seal Driver
07PAD-0010000
Removal
NOTE: Identify the valves and the valve springs as they are removed so that
each item
SEE MORE:
Before Performing Maintenance
Inspection and Maintenance
For your safety, perform all listed inspections and maintenance to keep your
vehicle
in good condition. If you become aware of any abnormality (noise, smell,
insufficient
brake fluid, oil residue on the ground, etc.), have your vehicle inspected by a
dealer.
(Note, how
Check
TRANSMISSION FLUID (HCF-2) LEVEL CHECK (CVT)
Check
NOTE:
Keep all foreign particles out of the transmission.
Check the transmission fluid level after the shift lever operation
without spending too much time.
1. Vehicle - Lift Set
2. Engine Undercover - Remove (With 2WD)
3. Transmission Fluid L
