Honda HR-V: TPMS Reset Procedures
NOTE: Whenever the pressure has been adjusted on one or more tires, tires have been rotated, or one or more tires have been replaced, the TPMS must be calibrated.
NOTE: If the system detects low tire pressure in any of the four tires, the low tire pressure/TPMS indicator comes on, as well as the message indicator. It will keep being turned on until calibration starts.
TPMS CALIBRATION PROCEDURE
The calibration begins when TPMS switch is pressed. The calibration is completed after driving at 31 to 62 mph (50 to 100 km/h), steadily without much acceleration or deceleration, for about 18 minutes. Full functionality of the system cannot be performed properly if the calibration is not completed.
1. Make sure the tires are inflated to the specified tire pressure listed on the doorjamb label.
2. Turn the ignition switch to ON (II), or press the engine start/stop button to select the ON mode.
NOTE: Vehicle must be stopped with the transmission in neutral (M/T) or P or N (A/T, CVT).
3. Press the TPMS switch (A) for 3 seconds. See Fig. 1.
4. When the calibration successfully begins, the indicator (B) blinks twice.
NOTE: If the indicator does not blink, check the TPMS switch.
5. The calibration process finishes automatically. It requires approximately 30 minutes of cumulative driving at speeds between 30-60 mph (48-97 km/h).
NOTE: During this period, if the ignition is turned on and the vehicle is not moved within 45 seconds, you may notice the low tire pressure/TPMS indicator comes on briefly. This is normal and indicates that the calibration process is not yet complete.
6. See Calibration Completion Check.
NOTE: The calibration check process will be interrupted if the vehicle moves. If the indicator does not go off after 2 seconds, keeps blinking, or stays on when the vehicle is in the ON mode, see appropriate manufacturer service information.
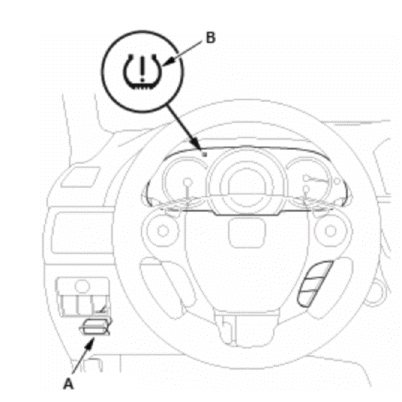
Fig. 1: Identifying TPMS Button & Information Display Indicator
CALIBRATION COMPLETION CHECK
Check if calibration is completed by doing the following:
1. Stop the vehicle and shift into neutral (M/T) or P or N (A/T, CVT) position.
2. Turn the ignition switch to LOCK (0), or press the engine start/stop button to select the OFF mode.
3. Turn the ignition switch to ON (II), or press the engine start/stop button to select the ON mode and wait to see the low pressure indicator come on for 2 seconds and then off.
4. Do not drive the vehicle and wait for 45 seconds as is.
5. If the calibration is completed, the indicator does not come on. If the calibration is not yet completed, then the indicator will come on for 2 seconds and then go off.
DISMOUNTING/MOUNTING PROCEDURES
NOTE: This vehicle is equipped with an Indirect TPM System. Vehicle IS NOT equipped with tire pressure sensors mounted on the wheels.
NOTE: Whenever the pressure has been adjusted on one or more tires, tires have been rotated, or one or more tires have been replaced, the TPMS must be calibrated.
See RESET PROCEDURES.
CAUTION: The TPMS may not function properly if tire type and size are mixed. Make sure to use the same size and type of tire.
TORQUE SPECIFICATIONS

READ NEXT:
 Traction Control, 4WD, & AWD
TRACTION CONTROL DISABLE
WARNING: Placing a non-compatible vehicle on a single-axle dynamometer
could result in
a safety hazard to technicians and damage to vehicle. Vehicles which use All-
Wheel Dri
Accessories & Electrical
CHARGING SYSTEM TROUBLE SHOOTING
NOTE: This is GENERAL information. This article is not intended to be
specific to any
unique situation or individual vehicle configuration. The purpose of this
Troub
SEE MORE:
Audio Unit Removal and Installation (Color Audio Type (5-inch Screen)
Removal & Installation
NOTE:
When working on electronic components, make sure the work area is clean
and dust free.
Make sure your hands are clean and free of oils and grease.
Eject the CD before disconnecting the audio unit to prevent damaging the
CD player's load mechanism.
If you are
Rear Seats
■Adjusting the Rear Seat-Backs
Pull the lever on the right to change the angle
of the right half of the seat-back, and left for
the left half.
■Folding Down the Rear Seats
The rear seats can be folded down separately to allow for additional storage
space.
■ To fold down the seat
1. Store th
