Honda HR-V: Engine Oil Filter Feed Pipe Removal and Installation
Honda HR-V (2015-2021) Service Manual / Engine / Lubrication System - Service Information / Engine Oil Filter Feed Pipe Removal and Installation
Removal
1. Oil Filter - Remove
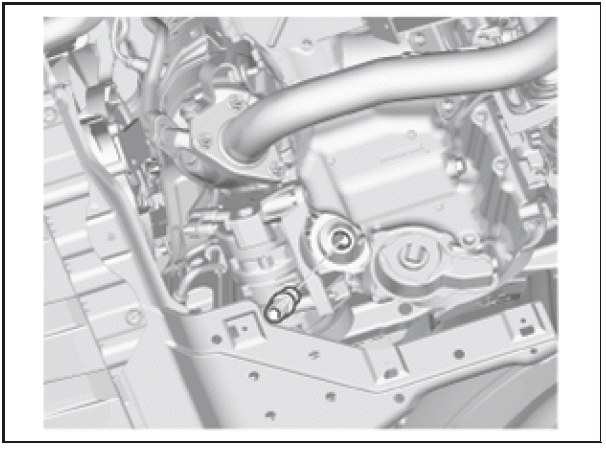
2. Oil Filter Feed Pipe - Remove
Installation
1. Oil Filter Feed Pipe - Install
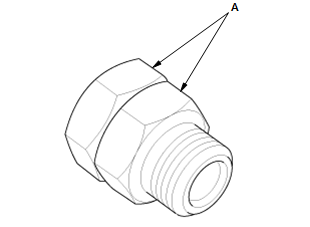
- Install the two 20 x 1.5 mm nuts (A) onto the oil filter feed pipe. Hold one nut with a wrench, then tighten the other nut
- Apply new engine oil to the oil filter feed pipe threads.
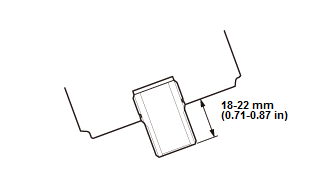
- Install the oil filter feed pipe in its specified height range shown
- Remove the nuts from the oil filter feed pipe.
2. Oil Filter - Install
ENGINE OIL FILTER REMOVAL AND INSTALLATION
Special Tools Required
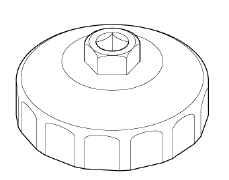
Oil Filter Wrench 07HAAPJ70101
Removal
1. Engine Undercover - Remove (With Engine Undercover)
2. Oil Filter - Remove
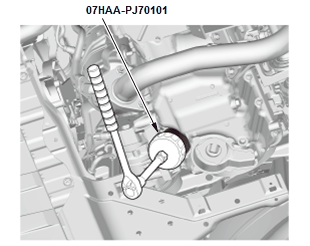
- Remove the oil filter with the oil filter wrench.
.png)
- Inspect the filter to make sure the rubber seal is not stuck to the oil filter seating surface of the engine
- Inspect the threads (A) and the rubber seal (B) on a new filter
- Clean the seat on the oil pan
- Apply a light coat of new engine oil to the oil filter rubber seal.
NOTE: Use only filters with a built-in bypass system.
Installation
1. Oil Filter - Install
.png)
- Install the oil filter by hand
- After the rubber seal seats, tighten the oil filter clockwise with the oil filter wrench.
Tighten: 3/4 Turn Clockwise
Tightening Torque: 12 N.m (1.2 kgf.m, 9 lbf.ft)
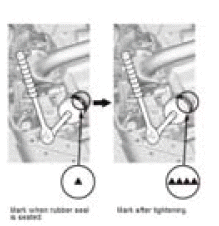
- If four numbers or marks (1 to 4 or * to****) are printed around the
outside of the
filter, you can use the following procedure to tighten the filter:
- Spin the filter on until its seal lightly seats against the oil pan, and note which number or mark is at the bottom.
- Tighten the filter by turning it clockwise three numbers or marks from the one you noted. For example, if mark ? is at the bottom when the seal is lightly seated, tighten the filter until the mark **** comes around to the bottom.
.png)
2. Oil Filter After Install - Check
- After installation, fill the engine with engine oil to the specified level, run the engine for more than 3 minutes, then check for oil leakage.
3. Engine Undercover - Install (With Engine Undercover)
4. Maintenance Minder - Reset (With Maintenance Minder System)
- If the Maintenance Minder required to replace the oil filter, reset the Maintenance Minder with the gauge (see "Resetting the Maintenance Minder").
READ NEXT:
 Engine Oil Pressure Switch Removal and Installation
Removal
1. Oil Pressure Switch - Remove
Disconnect the connector (A)
Remove the oil pressure switch
Remove any old liquid gasket from the oil pressure switch and the oil
pressure switch mounting
Description
ENGINE LUBRICATION SYSTEM DESCRIPTION - HYDRAULIC CIRCUIT
Overview
The lubrication method is a pressurized circulation type and it employs the
full-flow filtering system. In the
full-flow filtering s
SEE MORE:
Traction Control, 4WD, & AWD
TRACTION CONTROL DISABLE
WARNING: Placing a non-compatible vehicle on a single-axle dynamometer
could result in
a safety hazard to technicians and damage to vehicle. Vehicles which use All-
Wheel Drive (AWD) or traction control may not be clearly marked. Use common
sense and take all necessary prec
The Two Types of Injector Drivers
NOTE: This is GENERAL information. This article is not intended to be
specific to any
unique situation or individual vehicle configuration. For model-specific
information see appropriate a rticles where available.
OVERVIEW
There are two types of transistor driver circuits used to operate elec
© 2019-2025 Copyright www.hohrv2.com
