Honda HR-V: TPMS Reminder Reset - Procedure 1, 2, 3, 4
TPMS REMINDER RESET - PROCEDURE 1
NOTE: There is no TPMS reset procedure when re-inflating tires to the correct specification. Ensure tires are inflated to recommend pressure, and the TPMS indicator will go out shortly.
NOTE: If a flat tire is replaced with the spare tire, and the flat tire is stored in the cargo area, the low pressure indicator will stay on but the appropriate tire indicator will go off. This prevents the customer from thinking there is a problem with the spare tire. When the flat tire is taken out of the vehicle for repair, the TPMS indicator will come on because the system is no longer receiving the signal from the tire's transmitter.
All four tire pressure sensor IDs must be memorized to the TPMS control unit whenever you do any of these actions
- Replace the TPMS control unit.
- Replace the tire pressure sensor
- Substitute a known-good wheel with tire pressure sensor
When doing a tire rotation, memorizing the sensors in not needed.
Memorizing The Tire Pressure Sensor IDs
NOTE: For vehicles that use this procedure, a tire pressure sensor activation tool is needed. As early as 2007 Honda started requiring the use, on some models, of the TPMS Sensor Activation Tool ATEQ VT55 instead of the standard Sensor Initializer Tool AKS0620006 or Sensor Activation Tool Bartec Wheelrite Tech 300-J-48714. Honda is not entirely clear on which models the VT55 only can be used. The models listed below have ID memorizing procedures that name the VT55 only. The procedures for all other models name the VT55 and one of the older type activation tools, or just an older activation tool. The VT55 can be used on all models with initiator-less TPM Systems.
- Crosstour, CR-V (2007-12), CR-Z, Fit (2009 & later): Only use the TPMS Sensor Activation Tool ATEQ VT55
- All Other Models: Can use either TPMS Sensor Initializer Tool AKS0620006 or TPMS Sensor Activation Tool Bartec Wheelrite Tech 300-J-48714
NOTE: To ensure the control unit memorizes the correct ID, the vehicle with the new sensor must be at least 10 ft (3 m) away from other vehicles that have tire pressure sensors.
1. With the ignition switch in LOCK (0), connect the HDS to the data link connector (DLC) located under the driver's side of the dashboard.
2. Turn the ignition switch to ON (II).
3. Make sure the HDS communicates with the vehicle and the TPMS control unit. If it doesn't, troubleshoot the DLC circuit.
4. Select Sensor ID Learning from the mode menu on the HDS.
5. Follow HDS screen prompts to turn on the TPMS sensor initializer tool.
NOTE: On the TPMS Sensor Initializer Tool (AKS0620006), verify that the power switch (B) is in the "Low" position. See Fig. 15. If the power switch is in the "High" position, more than one sensor or sensors on other vehicles may be activated. Make sure the power switch is in the "Low" position.
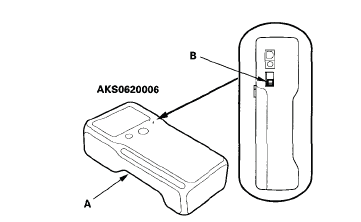
Fig. 15: Identifying TPMS Sensor Initializer Tool (AKS0620006) & Power Switch
6. Hold the TPMS sensor initializer tool near one wheel, memorize the pressure sensor ID by following the screen prompts on the HDS. See Fig. 16.
NOTE:
- If you turn the ignition switch to LOCK (0) before memorizing all four sensor IDs, the memorizing ID is cancelled.
- If more than one sensor ID is displayed on the HDS, verify that the power switch is in the "LOW" position, the vehicle has not been driven for 5 minutes, and there are no other vehicles within 10 ft (3 m).
- See the HDS Help menu for specific instructions.
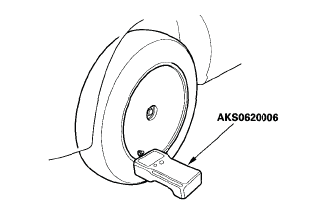
Fig. 16: Identifying TPMS Sensor Initializer Tool (AKS0620006) On Wheel (ATEQ
VT55 & Tech
300-J-48714 Are Similar)
7. Repeat step 6 for each wheel until all four sensor IDs are memorized. When all four IDs are memorized, the low tire pressure indicator blinks.
8. Turn the ignition switch to LOCK (0).
9. Disconnect the HDS from the DLC.
10. Test-drive the vehicle at 28 MPH (45 KM/H) or more for at least 1 minute.
11. Make sure the low tire pressure indicator does not blink.
12. Make sure the tires are inflated to the specified tire pressure listed on the doorjamb sticker.
TPMS REMINDER RESET - PROCEDURE 2
NOTE: When a tire pressure sensor is replaced, the sensor ID must be memorized by the TPMS control unit.
NOTE: If a flat tire is replaced with the spare tire, and the flat tire is stored in the cargo area, the low pressure indicator will stay on but the appropriate tire indicator will go off. This prevents the customer from thinking there is a problem with the spare tire. When the flat tire is taken out of the vehicle for repair, the TPMS indicator will come on because the system is no longer receiving the signal from the tire's transmitter.
Memorizing a Sensor ID Automatically
After rotating the tires or replacing a tire pressure sensor, drive the vehicle for at least 40 seconds at a speed of 15 mph (24 km/h) or more, and all the sensor IDs will be memorized automatically.
NOTE: When replacing the TPMS control unit, use the HDS to memorize IDs. After the IDs are memorized, reduce the pressure in all four tires to less than the appropriate specification, and check to see that the four tire indicators come on.
Memorizing a Sensor ID with the HDS
NOTE: To ensure the control unit memorizes the correct ID, the vehicle with the new sensor must be at least 3 m (10 ft) from any other TPMS pressure sensor not installed on that vehicle.
The HDS can memorize the ID of a new tire pressure sensor or a previously memorized ID.
1. With the ignition switch OFF, connect the HDS to the data link connector (DLC) located under the left side of the dashboard.
2. Turn the ignition switch ON (II), and memorize the ID of the tire pressure sensor by following the screen prompts on the HDS.
NOTE:
- See the HDS Help menu for specific instructions.
- When replacing the TPMS control unit, use the HDS to memorize IDs.
- After the IDs are memorized, reduce the pressure in all four tires to less than the appropriate specification, and check to see that the four tire indicators come on.an indirect TPMS that doesnt use tire pressure sensors mounted inside the tires. It uses the existing VSA wheel speed sensors to monitor and compare tire characteristics while driving.
TPMS REMINDER RESET - PROCEDURE 3
This vehicle is equipped with an indirect TPMS that doesn't use tire pressure sensors mounted inside the tires. It uses the existing VSA wheel speed sensors to monitor and compare tire characteristics while driving.
TPMS calibration is required after performing any of the following actions:
- Adjusting tire pressures
- Rotating the tires
- Replacing the tires
- Updating/replacing the VSA modulator-control unit
Calibration begins when TPMS switch is pressed or Calibration is selected through the Multi-information display (MID). The process finishes automatically as the customer drives the vehicle. This takes about 30 minutes of cumulative driving at 30 to 60 mph.
Calibration - Models With TPMS Switch
1. Make sure the tires are inflated to the specified tire pressure listed on the doorjamb label. Vehicle must be stopped with the transmission in neutral (M/T) or P or N (A/T, CVT).
2. Turn the ignition switch to ON (II), or press the engine start/stop button to select the ON mode.
3. Press the TPMS switch (lower dash, left of steering wheel) for 3 seconds.
4. When the calibration successfully begins, the TPMS indicator (instrument cluster, center left) blinks twice.
5. Calibration is completed after driving 31 to 62 mph (50 to 100 km/h), steadily without much acceleration or deceleration for about 30 minutes.
Calibration - Models Without TPMS Switch
1. Make sure the tires are inflated to the specified tire pressure listed on the doorjamb label. Vehicle must be stopped with the transmission in neutral (M/T) or P or N (A/T, CVT).
2. Turn the ignition switch to ON (II), or press the engine start/stop button to select the ON mode.
3. Use ARROW buttons (right side of steering wheel) to select VEHICLE SETTINGS, then press the SEL/RESET button. TPMS CALIBRATION appears on the display.
4. Press the SEL/RESET button. The display switches to the customization setup screen, where you can select CANCEL or CALIBRATE.
5. Use ARROW buttons to select CALIBRATE, then press the SEL/RESET button. CALIBRATION STARTED screen appears, then the display returns to the customization menu screen
NOTE: If the CALIBRATION FAILED TO START message appears, repeat steps 4 and 5.
6. Calibration is completed after driving 31 to 62 mph (50 to 100 km/h), steadily without much acceleration or deceleration for about 30 minutes.
TPMS REMINDER RESET - PROCEDURE 4
NOTE: Make sure the tire pressure is properly adjusted to the specified tire pressure listed on the doorjamb label before doing the TPMS calibration.
Do the TPMS calibration after doing the following items:
- Adjust the tire pressure
- Rotating the tires
- Replacing the tires
- Update/replace the VSA modulator-control unit
The calibration begins when the calibration is selected through the MID (multi-information display). The calibration is completed after driving in an ideal driving condition (28 to 65 mph (45 to 105 km/h), driving steadily without much acceleration or deceleration) for about 18 minutes. Full functionality of the system cannot be performed properly if the calibration is not completed.
1. Turn the ignition switch to ON (II), or the engine start/stop button is pressed to select the ON mode.
NOTE: Vehicle must be stopped with the transmission in neutral (M/T) or P or N (A/T and CVT).
2. Press the MENU button (left side of steering wheel) to enter the customizing mode.
3. Press the AUDIO REMOTE + or - button to select CUSTOMIZE SETTINGS > TPMS CALIBRATION > INITIALISE.
4. Press the AUDIO REMOTE + or - button to select YES.
5. When the calibration successfully begins, "TPMS CALIBRATION HAS BEEN INITIALIZED" gets displayed on MID when the system received the calibration.
NOTE: If the calibration does not begin successfully, "UNABLE TO INITIALIZE TPMS CALIBRATION" gets displayed on MID. Troubleshoot the TPMS.
READ NEXT:
 TPMS Reminder Reset - Procedure 5, 6, 7, 8, 9
TPMS REMINDER RESET - PROCEDURE 5
NOTE: Make sure the tire pressure is properly adjusted to the specified
tire pressure
listed on the doorjamb label before doing the TPMS calibration.
The calibration
SEE MORE:
Rear Differential Fluid Inspection And Replacement (AWD)
Inspection
1. Vehicle - Lift
2. Rear Differential Fluid - Check
Fig. 4: Differential Fluid Check With Filler Plug Torque Specifications
Use solvent and a brush to wash any oil and dirt off the oil filler
plug, and dry them with compressed
air
Remove the oil filler plug (A) and the sealing was
Blower Power Transistor Test
Test
SRS components are located in this area. Review the SRS component locations -
Refer to: SRS Component
Location Index (KA/KC), or SRS Component Location Index (KA/KC) and the
precautions and
procedures before doing repairs or service.
1. Glove Box - Remove
2. Blower Power Transistor - Test
