Honda HR-V: TPMS Reminder Reset - Procedure 5, 6, 7, 8, 9
TPMS REMINDER RESET - PROCEDURE 5
NOTE: Make sure the tire pressure is properly adjusted to the specified tire pressure listed on the doorjamb label before doing the TPMS calibration.
The calibration begins when the calibration is selected through the Multi-Information display. The calibration is completed after driving in an ideal driving condition 28 to 65 mph (45 to 105 km/h), driving steadily without much acceleration or deceleration for about 18 minutes. Full functionality of the system cannot be performed properly if the calibration is not completed.
Do the TPMS calibration after doing the following items.
- Adjust the tire pressure.
- Rotating the tires.
- Replacing the tires.
- Update/replace the VSA modulator-control unit.
Calibrate TPMS (Without TPMS Switch)
1. Make sure the tires are inflated to the specified tire pressure listed on the doorjamb label.
2. Turn the vehicle to the ON mode.
NOTE: Vehicle must be stopped with the shift lever in P or N position.
3. Press and hold the INFORMATION button for at least 3 seconds to enter the customizing mode. See Fig. 17.
4. Press the SEL/RESET button to select TPMS CALIBRATION.
5. Press the SEL/RESET button to select CALIBRATE.
6. When the calibration successfully begins, "CALIBRATION STARTED" is shown on the Multi- Information display.
NOTE: If the calibration does not begin successfully, "CALIBRATION FAILED TO START" gets displayed on multi-information display and do the troubleshooting the TPMS symptom troubleshooting.
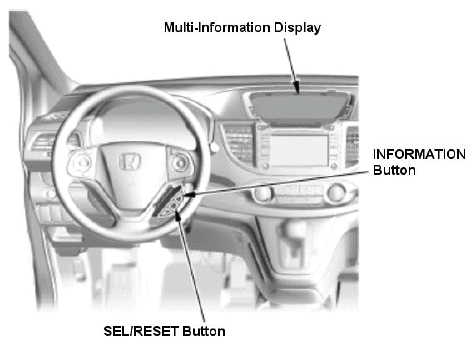
Fig. 17: Identifying TPMS Reset Controls
Calibrate TPMS (With TPMS Switch)
1. Make sure the tires are inflated to the specified tire pressure listed on the doorjamb label.
2. Turn the vehicle to the ON mode.
NOTE: Vehicle must be stopped with the transmission in P or N position.
3. Press the TPMS switch for 3 seconds. See Fig. 18.
4. When the calibration successfully begins, the indicator blinks twice.
NOTE: If the indicator does not blink, check the TPMS switch.
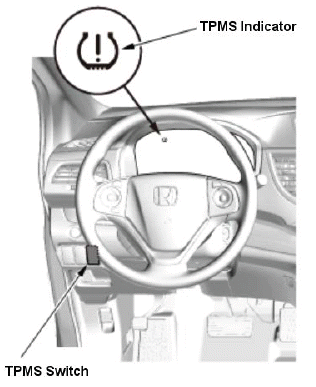
Fig. 18: Identifying TPMS Switch & Indicator
Calibration Check Method
The calibration check process gets interrupted if the vehicle moves. Do the troubleshooting if the indicator does not go off after 2 seconds, keeps blinking or stays on when the vehicle is in the ON mode.
Check if calibration is completed by following these procedures:
1. Stop the vehicle and shift into P or N position.
2. Turn the vehicle to the OFF (LOCK) mode.
3. Turn the vehicle to the ON mode and wait to see the low pressure indicator come on for 2 seconds and then off.
4. Do not drive the vehicle and wait for 45 seconds as is.
5. If the calibration is completed, the indicator does not come on. If the calibration is not yet completed, then the indicator comes on for 2 seconds and then goes off.
TPMS REMINDER RESET - PROCEDURE 6
Set the tire pressure of all wheels to pressure specified on the tire and loading information label. Make sure the vehicle is at a complete stop.
- For Manual transmission models: The shift lever is in "N".
- For CVT models: The shift lever is in "P".
- The power mode is ON.
Calibrate the system from the CUSTOMIZE SETTINGS menu on the multi-information display:
1. Press the UP/DOWN ARROW buttons on the right side of steering wheel to select CUSTOMIZE SETTINGS, then press the SEL/RESET button to see TPMS CALIBRATION appears on the display. See Fig. 19.
2. Press the SEL/RESET button. The display switches to the customization setup screen to select CALIBRATE.
3. Press the ARROW buttons and select CALIBRATE, then press the SEL/RESET button to see CALIBRATION STARTED screen appears, then the display returns to the customization menu screen.
4. The calibration process finishes automatically.
NOTE: If the CALIBRATION FAILED TO START message appears, repeat steps 2 and 3.
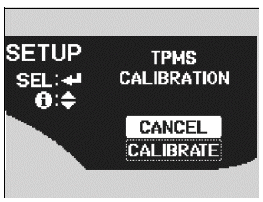
Fig. 19: Identifying Multi-Information Display (CR-Z)
TPMS REMINDER RESET - PROCEDURE 7
This vehicle is equipped with an indirect TPMS that doesn't use tire pressure sensors mounted inside the tires. It uses the existing VSA wheel speed sensors to monitor and compare tire characteristics while driving.
The calibration begins when the TPMS switch is pressed or the calibration is selected through the Multiinformation display. The calibration is completed after driving 31 to 62 mph (50 to 100 km/h), steadily without much acceleration or deceleration for about 18 minutes.
TPMS calibration is required after performing any of the following actions:
- Adjusting tire pressures
- Rotating the tires
- Replacing the tires
- Updating/replacing the VSA modulator-control unit
Calibration begins when TPMS switch is pressed (Models Without ACC) or Calibration is selected through the Multi-information display (Models With ACC). The process finishes automatically as the vehicle is driven. This takes about 30 minutes of cumulative driving at 30 to 60 mph.
Calibration - Models Without ACC
1. Make sure the tires are inflated to the specified tire pressure listed on the doorjamb label. Vehicle must be stopped with the transmission in neutral (M/T) or P or N (A/T, CVT).
2. Turn the ignition switch to ON (II), or press the engine start/stop button to select the ON mode.
3. Press the TPMS switch (lower dash, left of steering wheel) for 3 seconds.
4. When the calibration successfully begins, the TPMS indicator (instrument cluster, center left) blinks twice.
5. Calibration is completed after driving 31 to 62 mph (50 to 100 km/h), steadily without much acceleration or deceleration for about 30 minutes.
Calibration - Models With ACC
1. Make sure the tires are inflated to the specified tire pressure listed on the doorjamb label. Vehicle must be stopped with the transmission in neutral (M/T) or P or N (A/T, CVT).
2. Turn the ignition switch to ON (II), or press the engine start/stop button to select the ON mode.
3. Press and hold the INFORMATION button (right side of steering wheel) to enter the VEHICLE SETTINGS mode.
4. Press the SEL/RESET button to select TPMS CALIBRATION.
5. When the calibration successfully begins, "Calibration Started" gets displayed on Multi-information display when the system received the calibration.
NOTE: If the CALIBRATION FAILED TO START message appears, repeat steps 3 and 4.
6. Calibration is completed after driving 31 to 62 mph (50 to 100 km/h), steadily without much acceleration or deceleration for about 30 minutes.
TPMS REMINDER RESET - PROCEDURE 8
This vehicle is equipped with an indirect TPMS that doesn't use tire pressure sensors mounted inside the tires. It uses the existing VSA wheel speed sensors to monitor and compare tire characteristics while driving.
Calibration begins when it is selected through the Multi-information display (7-inch screen) or the TPMS switch is pressed (5-inch screen). Calibration is completed after driving 28 to 65 mph (50 to 100 km/h), steadily without much acceleration or deceleration for about 20 minutes.
TPMS calibration is required after performing any of the following actions:
- Adjusting tire pressures
- Rotating the tires
- Replacing the tires
- Updating/replacing the VSA modulator-control unit
With Display Audio Type (7-Inch Screen)
NOTE: Vehicle must be stopped with the transmission in neutral (M/T) or P or N (CVT).
1. Make sure the tires are inflated to the specified tire pressure listed on the doorjamb label.
2. Turn the vehicle to the ON mode.
3. Press the INFORMATION button (left side of steering wheel - See Fig. 20), then press the AUDIO REMOTE button to select the VEHICLE SETTINGS.
4. Press the AUDIO REMOTE button to select TPMS CALIBRATION.
5. Press the AUDIO REMOTE button to select CALIBRATE.
6. When the calibration successfully begins, CALIBRATION STARTED is displayed on Multi-information display when the system receives the calibration.
NOTE: If the calibration does not begin successfully, CALIBRATION FAILED TO START is displayed on Multi-information display.

Fig. 20: TPMS Reset Controls (Steering Wheel Controls)
With Display Audio Type (5-Inch Screen)
NOTE: Vehicle must be stopped with the transmission in neutral (M/T) or P or N (CVT).
1. Make sure the tires are inflated to the specified tire pressure listed on the doorjamb label.
2. Turn the vehicle to the ON mode.
3. Press and hold the TPMS switch (lower left dash) for 3 seconds.
4. When the calibration successfully begins, the indicator blinks twice.
TPMS REMINDER RESET - PROCEDURE 9
This vehicle is equipped with an indirect TPMS that doesn't use tire pressure sensors mounted inside the tires. It uses the existing VSA wheel speed sensors to monitor and compare tire characteristics while driving.
Calibration begins when it is selected through the Multi-information display (7-inch screen) or the TPMS switch is pressed (5-inch screen). Calibration is completed after driving 28 to 65 mph (50 to 100 km/h), steadily without much acceleration or deceleration for about 20 minutes.
TPMS calibration is required after performing any of the following actions:
- Adjusting tire pressures
- Rotating the tires
- Replacing the tires
- Updating/replacing the VSA modulator-control unit
With Display Audio Type (7-Inch Screen)
NOTE: Vehicle must be stopped with the transmission in neutral (M/T) or P or N (CVT).
1. Make sure the tires are inflated to the specified tire pressure listed on the doorjamb label.
2. Turn the vehicle to the ON mode.
3. Select the HOME button on the screen.
4. Select SETTINGS.
5. Select VEHICLE.
6. Select TPMS CALIBRATION.
7. Select CALIBRATION.
8. When the calibration successfully begins, CALIBRATION STARTED is displayed on Multi-information display when the system receives the calibration.
NOTE: If the calibration does not begin successfully, UNABLE TO INITIALIZE TPMS is displayed on Multi-information display.
With Display Audio Type (5-Inch Screen)
NOTE: Vehicle must be stopped with the transmission in neutral (M/T) or P or N (CVT).
1. Make sure the tires are inflated to the specified tire pressure listed on the doorjamb label.
2. Turn the vehicle to the ON mode.
3. Press the INFORMATION button (left side of steering wheel - See Fig. 20), then press the AUDIO REMOTE button to select the VEHICLE SETTINGS.
4. Press the AUDIO REMOTE button to select TPMS CALIBRATION.
5. Press the AUDIO REMOTE button to select CALIBRATE.
6. When calibration successfully begins, CALIBRATION STARTED is displayed on Multi-information display when the system receives the calibration.
NOTE: If calibration does not begin successfully, CALIBRATION FAILED TO START is displayed on Multi-information display.
With TPMS Switch
NOTE: Vehicle must be stopped with the transmission in neutral (M/T) or P or N (CVT).
1. Make sure the tires are inflated to the specified tire pressure listed on the doorjamb label.
2. Turn the vehicle to the ON mode.
3. Press and hold the TPMS switch (lower left dash) for 3 seconds.
4. When the calibration successfully begins, the indicator blinks twice.
READ NEXT:
 Engine Oil Filter Feed Pipe Removal and Installation
Removal
1. Oil Filter - Remove
2. Oil Filter Feed Pipe - Remove
Installation
1. Oil Filter Feed Pipe - Install
Install the two 20 x 1.5 mm nuts (A) onto the oil filter feed pipe. Hold
one nut wit
SEE MORE:
DTC Troubleshooting 53-11: Motor Relay Stuck ON
NOTE: Before you troubleshoot, review the general troubleshooting
information.
1. Problem verification:
Turn the vehicle to the ON mode.
Clear the DTC with the HDS.
Turn the vehicle to the OFF (LOCK) mode, then to the ON mode.
Check for DTCs with the HDS.
Is DTC 53-11 indicated?
YES
The fai
Overheating
How to Handle Overheating
Overheating symptoms are as follows:
The high temperature indicator (red) comes on or the engine suddenly
loses
power.
Steam or spray comes out of the engine compartment.
■ First thing to do
1. Immediately park the vehicle in a safe place.
2. Turn off all accessor
